
Introduction
Before installing Windows 11 Home or Pro on your Framework Laptop DIY Edition, make sure you've installed memory, storage, and WiFi. Here is a link to the Framework Laptop DIY Edition Quick Start Guide where we go over all the steps to get started.
Don't forget to install the Driver Bundle (Download here) after you complete Windows 11 installation. Because the hardware in the Framework Laptop is so new, a fresh Windows install doesn't have the needed drivers for full hardware support.
Note that if you're on an AMD-powered Framework Laptop, you'll need to follow this guide instead.
Tools
Parts
No parts specified.
-
-
If you purchased Windows from Framework, log into your Framework account and navigate to Digital Purchases to redeem your Product Key.
-
Windows 10 Product Keys can be used to install Windows 11, and Windows 11 Product Keys can be used to install Windows 10!
-
Once you redeem your Product Key for Windows, you will not be able to return it for a refund. You can always choose to redeem your key and activate Windows after you complete installion, as the installer lets you skip the Product Key entry step.
-
Don't forget to install the Driver Bundle after you complete Windows 11 installation. Because the hardware in the Framework Laptop is so new, a fresh Windows install doesn't have the needed drivers for full hardware support.
-
If you don't have a Windows Product Key yet, you can still proceed with installation and then activate Windows later. You can pick up a Windows Product Key from the Framework Marketplace.
-
-
-
Download and launch Microsoft's Windows 11 Media Creation Tool.
-
If you navigate to this page from a Linux or Mac system, it'll direct you to download a Windows .iso instead of the Media Creation Tool. We recommend finding a Windows machine instead to create the installer to avoid any issues.
-
If using Rufus, Ventoy, or similar instead of Microsoft's Media Creation Tool on 13th Gen Intel Core, you'll need to follow the steps here to set WiFi to fallback mode to avoid an installer blue screen.
-
Accept the license agreement. If launching from Windows 10, select "Create installation media for another PC," and click Next. Select the language and architecture, select "USB flash drive", then select the drive you'd like to use and wait for the installation media to be created.
-
Once creation completes, eject and remove your USB Flash Drive.
-
If you're using an AX201 WiFi module with a 12th Gen Intel Core Mainboard, the current Windows 11 installer doesn't contain the necessary drivers. Since Windows 11 now requires network access during installation, you'll need to either use Ethernet or follow the workaround in this article to manually load the driver. Note that this isn't needed for AX210 WiFi modules.
for anyone else installing from mac, here’s a video with the instructions I used: https://www.youtube.com/watch?v=06KAT0TB.... Framework did the WiFi fallback automatically (finger guns).
Going from macOS14
to Framework13 Intel Ultra1
Senior Jeff - Resolved on Release Reply
For those who want to go full DIY and do everything from your new Framework laptop with empty disks, boot from a Linux live USB (as a do-it-yourselfer, you already have one). Using a partition editor,
1. Format a USB drive with two partitions, one at least 1GB FAT32 and one at least 8GB NTFS.
2. Add an NTFS partition to one of the drives in the laptop to hold the Windows installation ISO, or download it to another USB drive.
3. Mount the ISO file in Linux:
sudo mount windows-file-name.iso /mnt4. Copy all the contents to the NTFS partition on the USB.
5. Copy all the contents except the
sourcesdirectory to the FAT32 partition.6. Create an empty
sourcesdirectory on the FAT32 partition and copy theinstall.wimfile into it.7. Shut down Linux and boot from the installation USB you have created.
When the installation requires you to connect to a network, with disabled Next button and no other options, type Shift+F10 to get a command window and enter the command
oobe\bypassnro. Using Ventoy sounds promising, though.Would propose Ventoy to prepare USB-storage. Easy-to-use for many different ISO-files. Has GUI for Linux and Windows - very easy to use. Much more comfortable and faster than writing ISO content to USB-storage. Just copy ISO-files like regular files and Ventoy makes boot menu of ISO files found on USB-storage. Much easier also keep ISO-files up-to-date. Has also tweaking for MS Windows 11 installation, in future might contain similar hacks.
If Windows 11 Media Creation Tool is not successfully downloading the OS onto your USB flash drive, make sure your flash drive is in NTFS format, not FAT32. You can right click on the drive in File Explorer > Click "Format" > Change "File System" drop down to "NTFS".
Huh. I had to reformat my USB drive to exFAT to get this to work. It didn't work for me when I reformatted it to NTFS.
-
-
-
Power off your Framework Laptop if it is on.
-
Plug your bootable USB Flash Drive into your Framework Laptop.
-
Power on your Framework Laptop. If the Storage device installed in your laptop is blank, it will boot directly into the Windows Installer.
-
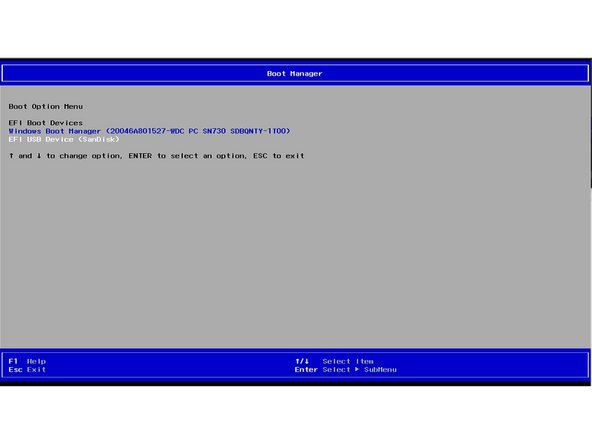
If you have an existing operating system installed on the laptop, you'll need to tap F12 repeatedly while booting in order to choose your USB Flash Drive to boot from.
-
This will take you to the Boot Manager menu shown in the screenshot. Use your arrow keys to select the "EFI USB Device", and then press Enter.
-
-
-
Select the appropriate locale options from the drop down menus on the first screen, click Next, and then click "Install Now" on the next screen.
-
The Windows installer uses a fallback driver for the touchpad, so the touchpad behavior may be somewhat janky. After you complete installation and install the Framework Laptop Driver Bundle, the touchpad will behave normally.
-
The cursor may not appear until after swiping on the touchpad for a few seconds. If the cursor still doesn't appear, hard power down the laptop by holding the power button until the system shuts off. Wait 15 seconds, and power on again. You can also use the Tab and Enter keys on the keyboard or an external USB mouse to complete the installation.
-
You can enter the Product Key now or click on "I don't have a product key" to enter it after installation is complete.
-
If you are entering a Product Key later, choose the version of Windows you'd like to install. This will usually be "Windows 11 Home" or "Windows 11 Pro".
-
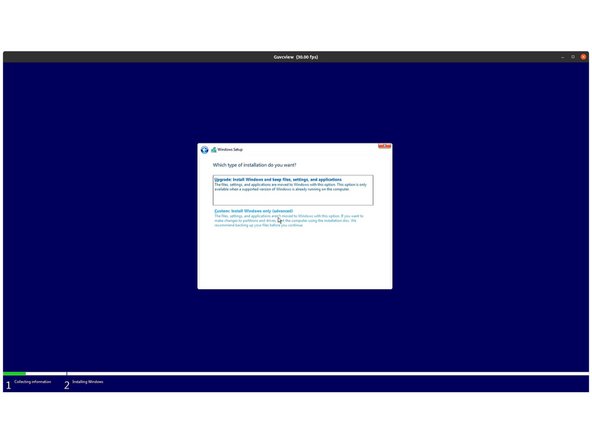
You can then accept the license terms. On the next page, select the Custom: Install Windows only (advanced) option, and Windows will now begin the installation process. Your laptop should restart when complete.
-
If your USB Flash Drive is large, the installer may prompt you to choose which drive to install Windows on. Select the internal drive (typically Drive 0), not the one labelled "ESD-USB". If you are overwriting an existing OS, you'll likely need to select and Delete the partitions on the drive to make space for your Windows install.
-
For 13th Gen Intel Core, the Windows 11 installer from Microsoft has a compatibility issue with WiFi that could result in a blue screen during installation. We automatically detect the Windows installer and enter a fallback mode to prevent this, but if you see it occur, you can manually enter fallback mode using instructions here.
I had a weird issue (FW13 AMD DIY): windows installer booted correctly from the usb thumbdrive, however I got a cryptic message about missing drivers about my hardware, preventing from going forward with the windows install.This is not about the missing wifi driver. In the end what fixed it for me was booting my thumbdrive from a USB hub instead. Go figure...
When I got to the "Let connect to the Internet" screen, I hit the Shift-FN-F10 (thanks Murray Sampson). This brought up the command prompt, and I was able to go to the D: drive (USB) and run the driver exe file. After the drivers loaded (it took about 5 to 10 minutes), it rebooted and I was able to use the WiFi.
Steven Keller - Resolved on Release Reply
I have the Framework 13 DIY AMD version and the most recent version of the Windows installer does NOT include drivers for the WiFi. I had to force the install to allow me to skip connecting to the network by pushing Shift-FN-F10 to get a command prompt when I reached that point, then typing the command OOBE\BYPASSNRO. That let me restart installation and have the option to click “I don’t have internet”. After that, I could enter a “limited” version of Windows and manually install the current drivers for my system using the exe downloaded from the website and saved to a USB thumb drive. Now things seem to be working correctly.
Murray Sampson - Resolved on Release Reply
I found the troubleshooter button, but I called my vendor instead and they suggested I use the telephone method, which worked.
Louis Puster - Resolved on Release Reply
When I click "I don't have a product key", windows installs, but when I try to activate by using "Change product key", I get an error that the product key I entered has already been used on another computer, even though this is not true. The window suggested that I click on the troubleshooter if the key has not been previously used, but there is no troubleshooter button or link.
Louis Puster - Resolved on Release Reply
-
-
-
The installer will reboot and take you through the Windows setup process. Follow the on-screen prompts to select your region and keyboard layout.
-
Until you complete installation and install the Driver Bundle, the Touchpad will be operating in a compatibility mode where functions like two finger scrolling won't work. You can click and drag scrollbars or use the keyboard arrow keys to navigate lists during setup.
-
Select and connect to your network, and then let Windows download updates.
-
Note that if no networks are visible, it is possible you're using an older Windows 11 installer that is missing the necessary WiFi driver. You can download the latest installer to resolve this.
-
Note that Windows 11 now requires you to connect to a network and log into a Microsoft Account during installation. There are some workarounds for this floating around online, but it's unclear how long they will continue to work.
-
After the system reboots, set your system name. After it reboots again, if you connected to a network earlier, log in to your Microsoft account (or create one). If you skipped network connection, create your local account.
-
Create a pin if prompted. If you logged into a Microsoft account that has a previous OneDrive backup, you'll be presented an option to restore from it. Otherwise, you can set up as a new device.
-
Select your preferred privacy settings, then select customization options or skip the step. Set up OneDrive or select "Only save files to this PC." Select or skip a few annoying upsell screens Microsoft puts in front of you. Setup will then complete and reboot into Windows.
-
-
-
You'll now need to install the Framework Laptop Driver Bundle to get your laptop fully functional.
-
First, download the Driver Bundle for your Framework Laptop from here. If you haven't connected to a network yet, you'll need to download this on another system and then copy it over using a USB Flash Drive.
-
Navigate to the folder where the Framework Laptop Driver Bundle is, and double-click on it. Click Yes on the "Do you want to allow this app to make changes to your device?" prompt that comes up.
-
The Framework Laptop Driver Bundle will automatically install all of the drivers required to use the Framework Laptop. It will take several minutes to install. At the end of the install, you will be prompted to press any key to reboot. Press any key.
-
After the laptop reboots, you're done! You can connect to a network if you didn't do that earlier and also Activate Windows if you didn't enter a Product Key during installation.
-
Make sure to run Windows Update after you're connected to a network to get the latest security updates. In the future, you'll also be able to get driver and firmware updates through Windows Update.
-
Make sure to update your laptop firmware to the latest available to ensure optimal performance and stability. We also recommend updating your SSD firmware, as we have seen issues on some versions of SN850. Instructions for Western Digital SSD firmware updates are available here.
The statement "Make sure to update your laptop firmware to the latest available to ensure optimal performance and stability." is misleading because it leads you to a download page that ultimately leads you to the same Drivers+BIOS download page you've already visited during one of the previous bullet points from Step 6.
ICAB Incubator - Open Reply
IMPORTANT: During the driver installation process, you may be prompted to restart or reboot the system.
DO NOT ACT ON THESE NOTIFICATIONS.
INSTEAD,Wait until all drivers have been installed before rebooting.
ICAB Incubator - Open Reply
I have a Laptop 13 DIY with AMD. It arrived with BIOS 3.03. The Windows 11 23H2 installer doesn't include drivers for the included RZ616 Wi-Fi adapter. Using Rufus I found I could install Windows 11 with no Internet connection, but the result seemed somewhat unstable, even after I later installed the AMD driver bundle. I tried again right from the beginning with a wired Internet connection using the Ethernet "expansion card" and the result seemed much better. Presumably, you could also use any USB to Ethernet adapter that doesn't need drivers in Windows 11. Since then, I have updated everything, including all optional driver updates under advanced options in Windows update. The result has always been good and stable, especially once I upgraded beyond BIOS 3.03 (3.03b and now 3.05). Take all this only at its face value — one user's experience setting up one laptop one time.
Brian Gregory - Resolved on Release Reply
Make sure to update your laptop firmware to the latest available to ensure optimal performance and stabilityThe update link in the paragraph above should be changed to not link to the 11th Gen firmware update page any longer. A seperate link for 11th Gen and 12th Gen would be more helpful and less confusing here.
Simon Knight - Resolved on Release Reply
Updating from Windows 10 Pro to Windows 11 Pro on 12th Gen Framework Laptop required using Windows 11 Installation Assistant. Windows 11 Update was not showing up in Windows Update for me.
Simon Knight - Resolved on Release Reply
Found this thread in the forum: https://community.frame.work/t/windows-1...
Seems like Windows 10 driver bundle for 12th gen is not supported. I haven't had any issues so far on the Windows 11 bundle by itself. Seems like windows 11 bundle works fine out of the box for windows 10.
Andrew Silberfeld - Resolved on Release Reply
Hello,
I have a 12th gen laptop but I put windows 10 onto it and was doing the manual download of the drive since I got the DIY edition of the laptop. I assumed that I should use the 12th gen drive bundle over the 11th gen but there was no windows 10 option for the drivers in the 12th gen page. Are the 12thGen laptop drivers in the Windows11 bundle backwards compatible with windows 10? Seems tentatively like they back-compatible since the installation was successful and my wifi is now working (wasn't before), but i'm not sure if there are more subtle things that haven't worked properly. Some additional documentation for this case would be appreciated!
Best,
Andrew
Andrew Silberfeld - Resolved on Release Reply
-


- If you have any questions or concerns, feel free to reach out to Framework Support.
- If you have any questions or concerns, feel free to reach out to Framework Support.
Cancel: I did not complete this guide.
32 other people completed this guide.
10 Comments
I have a Framework 13 with an AMD chipset and Linux installed.
Now I would like to do a fresh install of Windows 11. The EFI USB was created following the instructions here. I do see the EFI USB when booting in the BIOS boot menu. However, when selecting the USB I get the following message: "Framework Laptop EFI USB Device Boot failed"
I have tried this with two different USB flashdrives but no luck. Could not locate any obvious problems in the BIOS set-up either. Any idea what could be wrong?
Jochen Nagel - Resolved on Release Reply
I am having a devil of a time installing Windows 11 on a brand new 12th gen Intel Framework (i7-1260p). I'm trying to install again and wipe everything away but when I try and boot into BIOS it just keeps looping the framework logo screen and then seemingly cycling off and on again. The first install that was successful continuously crashed or froze up (over the course of 3 working hours), especially with Zoom. I've been hunting for a solution and so far I've updated the firmware on the WD SN850 SSD and if I can get it to start again I'll install the BIOS update. This is nuts because I have an i5 12th gen running Manjaro and install and operation were super easy. Been using it for a few months and aside from a few hiccups it's been totally reliable. Windows never does anything that makes it seem like a decent OS to me. I'd never use it if it wasn't for work.
Brendan Ryan - Resolved on Release Reply
Rebuilt the USB image and tried again, worked this time. Dunno.
Kit Plummer - Resolved on Release Reply
This, and the workaround, aren't working around for me. Even after copying the wifi drivers I am getting a Windows Setup screen and a Load driver dialog saying "A media driver your computer needs is missing." Any ideas?
Kit Plummer - Resolved on Release Reply
At the “Let’s connect you to a network” phase, no networks show, it’s just a blue screen that says that and “I don’t have internet.” My DIY kit didn’t come with a wifi card—is there a chance my computer might not have one?
Dez Miller - Resolved on Release Reply
11th Gen US/Canada DIY Editions (including the Refurbished versions of those) do not have WiFi pre-installed. All other Framework Laptop configurations (11th Gen DIY Edition in UK/EU, all 12th Gen systems) have WiFi pre-installed. WiFi modules are available in the Framework Marketplace: https://frame.work/marketplace/parts
At the step: "Where do you want to install Windows?", there are no drives in the list to choose from.
This tutorial says: “Select the internal drive (typically Drive 0), not the one labelled "ESD-USB".”
But I don’t see any of that.
It says: "We couldn't find any drives. To get a storage driver, click Load Driver."
I TRIED:
downloading an Intel Rapid Storage Technology (IRST) driver through Asus.com
But it did not work. The Framework doesn't recognize it when I browse for a driver.
Is there any IRST that is better compatible with the Framework? I couldn't find any on your website.
Or else, is there any solution besides IRST to find and load a driver and setup windows?
Looking forward to start using my new laptop :)
1. Make sure you have physically installed your storage drive correctly. For example, make sure it is fully inserted and that it is an NVMe SSD and not SATA.
2. Make sure you use Microsoft’s Media Creation Tool for Windows 11 to create the USB drive, and not another tool like Ventoy or Rufus.
Intel i7-1185G7
* The Windows 11 installation restarted unexpectedly (crashed) while I was entering my user credentials. However, I was able to continue the installation after the reboot without any problems.
* After using the Media Creation Tool, I copied the Driver Bundle directly on the prepared Windows installation USB Flash Drive. This way I could immediately install the drivers, after installing Windows.
* I've been using Windows 11 extensively on the laptop for the past days. It seems rock solid so far.
David Matscheko - Resolved on Release Reply
Shift + F10 then enter OOBE\BYPASSNRO to bypass Wi-Fi for those stuck at the network page.
Justin - Open Reply
My laptop has a Ryzen 5 7640U processor, does that mean that I need to install the Ryzen 7040 driver bundle?
Tjalling - Resolved on Release Reply