
Introduction
Once you have your Framework Laptop 13 set up following the Quick Start Guide, you’re ready to install your preferred OS. With the latest release of Linux Mint, everything works pretty smoothly. You can check our Linux page for additional Linux compatibility notes.
NOTE: This is a Compatible Community Supported Linux Distribution. Learn more here.
Tools
No tools specified.
Parts
-
-
First, download Linux Mint from Linux Mint's website. Linux Mint has a detailed installation guide that you can follow. We'll go through the steps in this Guide assuming you have a simple installation scenario of a fresh install on a blank drive.
-
Download balenaEtcher as a tool to create the USB installer from the ISO. balenaEtcher is available for MacOS. Install it.
-
Launch balenaEtcher. Insert your USB drive (8GB or larger). Click on "Flash from file" and select the Linux-Mint iso that you downloaded. Click on "Select target" and choose your USB drive. Click "Flash" and wait a minute or two for it to complete.
-
Once the USB drive creation is complete, you can close balenaEtcher and eject the USB drive from your OS.
-
-
-
First, download Linux Mint from Linux Mint's website. Linux Mint has a detailed installation guide that you can follow. We'll go through the steps in this Guide assuming you have a simple installation scenario of a fresh install on a blank drive.
-
New line.Download Rufus as a tool to create the USB installer from the ISO - select the top download option from the link provided. Rufus is available for Windows. Install it.
-
Launch Rufus. Insert your USB drive (8GB or larger). Click on "Flash from file" and select the Linux-Mint iso that you downloaded. Click on "SELECT" and choose your USB drive. Click "START" and wait a minute or two for it to complete.
-
-
-
Secure Boot is optional: Enabling secure boot is completely optional and not necessary for normal operation, it's a personal choice. Follow this link if you wish to enable it before installing Linux Mint. More about secure boot here.
-
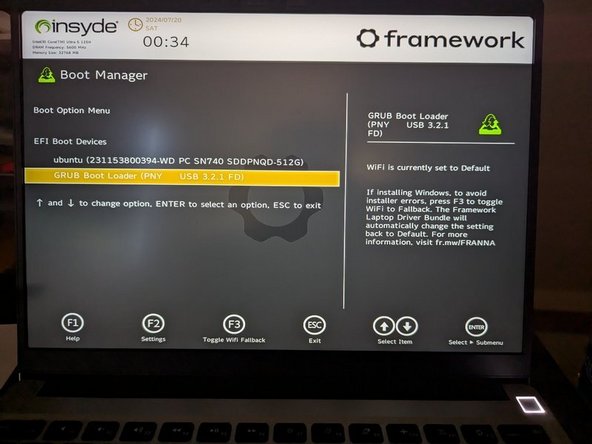
Insert the USB drive into your powered off Framework Laptop 13, and then power on. If you have an existing OS installed on the Storage drive in your laptop, immediately after the power light comes on begin rapidly tapping (continuously ) the F12 key - you must begin tapping well before you see the Framework logo.
-
If you don't have an internal storage drive installed or it is blank, the laptop will boot to the USB drive directly.
-
Hit Enter again to boot into Linux Mint.
-
After a few seconds, you're in! If you just want to try Linux Mint out, you can use the live USB version of it without touching the internal storage drive. If you do want to install Linux Mint to the internal storage drive, go on to the next step.
-
-
-
Click on the Install Linux Mint icon on the desktop.
-
Select the language and keyboard language you'd like to use. On the Multimedia codecs screen, optionally check the "Install multimedia codecs" box and set a Secure Boot password, and click Continue.
-
If you do select Secure Boot, on the first boot after installation, a blue screen will come up, and you can select Continue.
-
On the "Installation type" screen, you may have a range of options available if there is already on OS on your internal drive. For the purposes of this guide, we're assuming a clean install with the "Erase disk and install Linux Mint" option. For the other advanced options around dual booting, check Linux Mint's documentation. Click "Install Now".
-
Follow the on-screen instructions to select your time zone and set up your user account. After installation completes, click Restart Now.
-
-
-
Before updating to the latest firmware, let's make sure we verify which BIOS were running. Please follow this guide.
-
If you have Intel 11th Gen Intel Core, you can check here for the latest firmware.
-
If you have Intel 12th Gen Intel Core, you can check here for the latest firmware.
-
If you have Intel 13th Gen Intel Core, you can check here for the latest firmware.
-
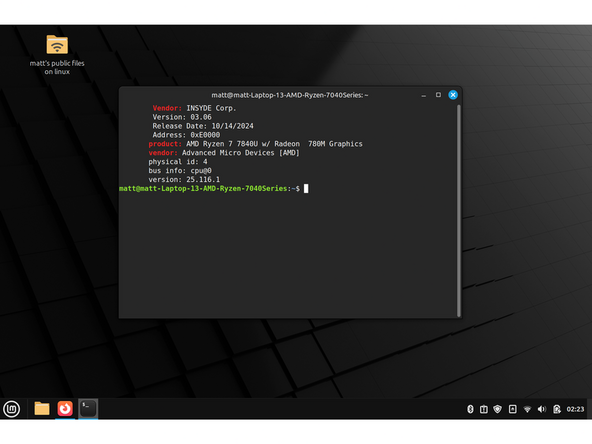
If you have AMD Ryzen 7040 Series, you can check here for the latest firmware.
-
If you have Intel Core Ultra Series 1, you can check here for the latest firmware.
-
-
-
If you need additional help, feel free to visit our active support community.
-


Enjoy using Mint on your Framework Laptop 13! If you have any questions or run into any issues, we recommend bringing them to the Community in the Linux Mint topic. Members of the Framework team participate in discussions there.
Enjoy using Mint on your Framework Laptop 13! If you have any questions or run into any issues, we recommend bringing them to the Community in the Linux Mint topic. Members of the Framework team participate in discussions there.
Cancel: I did not complete this guide.
14 other people completed this guide.
11 Comments
I have a Ryzen 7040 FW13. Are there any specific steps for AMD-based devices?
Yes, these instructions. The only variation is at step 5 for firmware. The setup is the same elsewhere.
In order to add a fingerprint, this guide is quite complete: https://wiki.debian.org/SecurityManageme...
This is some of it. It's mostly there, but as I have worked directly with the Mint team on this, there are other factors needed for logging in with the fingerprint reader. It is coming, I have it working. We just need to make it presentable.
My Linux Mint 21.3 installation got hung up looking for a file called mmx64.efi. It was recommended I use Rufus 4.4 with some sort of workaround. However, after several frustrating hours trying to get Rufus to run and failing, I've tried another idea involving renaming the grubx64.efi outside the installation stick, but "paste" was greyed out on the stick. So that failed.
Finally I have no choice but to try installing an older version. I've used LM for an number of years on two Mint Minis with very few issues. So this is very disappointing.
Alan Ripponn - Resolved on Release Reply