
Introduction
The Framework Laptop 16 DIY Edition uses an AMD RZ616 WiFi card that the Windows 11 installer doesn't currently include drivers for. To avoid getting stuck during installation, we recommend using Rufus to create the installer, which allows you to bypass the network requirement. This guide takes you through the steps to use Rufus to create a Windows 11 installer.
Note that if you have an Ethernet Expansion Card and a wired connection, you can use the Microsoft Media Creation tool instead.
Tools
Parts
No parts specified.
-
-
If you purchased Windows from Framework, log into your Framework account and navigate to Digital Purchases to redeem your Product Key.
-
Once you redeem your Product Key for Windows, you will not be able to return it for a refund. You can always choose to redeem your key and activate Windows after you complete installation, as the installer lets you skip the Product Key entry step.
-
-
-
On a different computer, download the Download Windows 11 Disk Image (ISO) for x64 devices from here.
-
In the dropdown select Windows 11 (multi-edition ISO for x64 devices) as pictured, and click Download Now.
-
-
-
Download the latest version of Rufus from here.
-
If you are on Windows you will typically need the Standard version outlined here in red or the Portable version if you prefer to run Rufus without installation.
Not helpful for Linux unfortunately but for anyone else who hits this step on a Mac and got stuck - I just went through a successful installation without Rufus using Disk Utility and the 'wimlib' tool on a Mac using this guide to formatting the USB: https://jensd.be/1740/windows/create-a-b...
What do you do if you cannot get Rufus? I've not a Windows computer to download Rufus, only System76 running Linux Mint.
-
-
-
Plug in a USB thumb drive of at least 8GB in size (note that this will be wiped during installation, so use a blank drive or one with data you don’t need to preserve) into the computer you have Rufus and the Windows 11 ISO on.
-
A Storage Expansion Card can also work for this if you have one.
-
Once the USB drive is connected launch Rufus.
-
-
-
Under Device, choose the USB thumb drive.
-
Note that if you’re using a very large thumb drive and no drives appear, you may need to click Show advanced drive properties and select List USB Hard Drives
-
Click SELECT next to Boot selection and choose the Win11_22H2_English_x64v2.iso that you downloaded earlier.
-
-
-
You can keep the rest of the settings as the defaults. Click START. You’ll get a screen that says “Windows User Experience”. You can keep those settings as the defaults also, and click OK. You can also adjust the settings if you’d like at this screen, but make sure Remove requirement for an online Microsoft account remains selected.
-
After you click OK you'll see a warning that the USB Thumb Drive will be erased during, click OK on this and Rufus will create your install Media
-
Once the Green Status Bar is complete you can remove the USB Thumb Drive, plug it into your Framework Laptop 16, and proceed to install Windows
If you ended up not checking "Remove requirement for an online Microsoft account" there are still ways of using this installer. To be prepared, download the Framework Windows 11 driver pack .exe file and drop it onto the bootable Windows installer USB you just created.
In the Windows installer, once you get stuck because Microsoft wants it to be online for you to sign into your account - this is still in the installer and there is no driver for the FW16's wifi adapter or the ethernet expansion card. You can make this work with a 3rd party USB wifi or ethernet adapter that Windows installer happens to have a driver for - or alternately install the driver pack right now. Here's how:
Press Shift-F10. That will bring up a cmd.exe window where you can launch the driver pack installer from the Windows install USB if you had put it there earlier. If you're not comfortable with cmd, then in the cmd window simply type explorer.exe and Windows explorer will come up to let you browse for the driver pack installer.
-
-
-
Power off your Framework Laptop if it is on.
-
Plug your bootable USB Flash Drive into your Framework Laptop.
-
Power on your Framework Laptop. If the Storage device installed in your laptop is blank, it will boot directly into the Windows Installer.
-
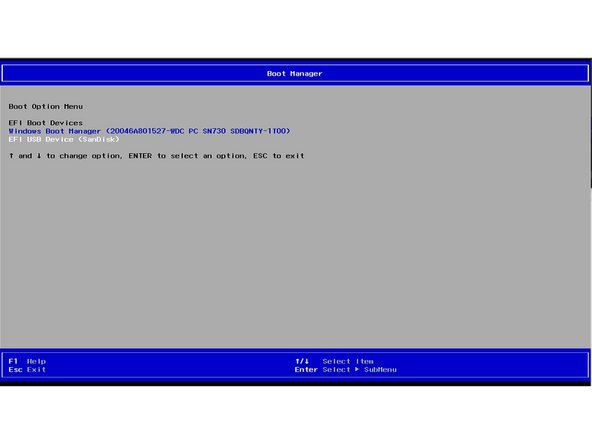
If you have an existing operating system installed on the laptop, you'll need to tap F12 repeatedly while booting in order to choose your USB Flash Drive to boot from.
-
This will take you to the Boot Manager menu shown in the screenshot. Use your arrow keys to select the "EFI USB Device", and then press Enter.
-
-
-
Select the appropriate locale options from the drop down menus on the first screen, click Next, and then click "Install Now" on the next screen.
-
The Windows installer uses a fallback driver for the touchpad, so the touchpad behavior may be somewhat janky. After you complete installation and install the Framework Laptop Driver Bundle, the touchpad will behave normally.
-
The cursor may not appear until after swiping on the touchpad for a few seconds. If the cursor still doesn't appear, hard power down the laptop by holding the power button until the system shuts off. Wait 15 seconds, and power on again. You can also use the Tab and Enter keys on the keyboard or an external USB mouse to complete the installation.
-
You can enter the Product Key now or click on "I don't have a product key" to enter it after installation is complete.
-
If you are entering a Product Key later, choose the version of Windows you'd like to install. This will usually be "Windows 11 Home" or "Windows 11 Pro".
-
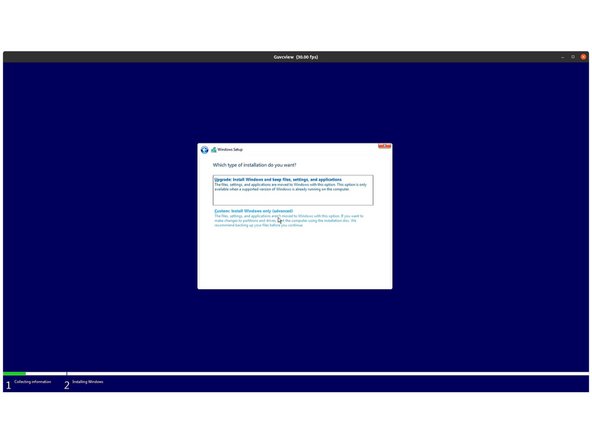
You can then accept the license terms. On the next page, select the Custom: Install Windows only (advanced) option, and Windows will now begin the installation process. Your laptop should restart when complete.
-
If your USB Flash Drive is large, the installer may prompt you to choose which drive to install Windows on. Select the internal drive (typically Drive 0), not the one labelled "ESD-USB". If you are overwriting an existing OS, you'll likely need to select and Delete the partitions on the drive to make space for your Windows install.
I bought a key to Windows 11 Pro and the first time I installed it, skipped entering the key in the early stage of the installer so I could enter it later. It then asks which version of Windows to install, as mentioned in this step. It's possible I didn't select the right one, or something else went wrong because after Windows was installed, I wasn't able to apply my key.
After starting the install over again, I entered the key from the beginning of the installer and it skipped asking for which edition, and Windows came up activated. Funny thing is, Windows claims to be Windows 11 Pro, exactly like what I had chosen the first time.
TL;DR : it might be beneficial to enter the product key at the earliest possible point in the installation.
Couldn't download Rufus on Linux Mint, so used the built in image loader. Only screenshot matching my experience is the first. Second and third were either skipped or never came because the load didn't have the driver bundle, which I've detailed in a community post isn't being identified.
For those who want a clean installation, especially if you are coming from Linux, follow these instructions when you are on the partition menu.
1. press SHIFT+F10 then type:
diskpart
select disk 0
clean
exit
exit
2. Refresh and select the unallocated partition (Only one shown) then click next, windows will create all needed partitions.
Done.
-
-
-
The installer will reboot and take you through the Windows setup process. Follow the on-screen prompts to select your region and keyboard layout.
-
Until you complete installation and install the Driver Bundle, the Touchpad will be operating in a compatibility mode where functions like two finger scrolling won't work. You can click and drag scrollbars or use the keyboard arrow keys to navigate lists during setup.
-
After the system reboots, set your system name.
-
This guide assumes you are installing without an internet connection, when prompted to connect to Network, click "I don't have Internet", continue to click "limited setup", accept the license agreement and continue to create a local user account.
Actually there was no visible option to complete the clean setup process without Internet connection, even with Ethernet module present. Following the Framework Community Support QA, I did the following when the Internet connection was expected:
Press Shift + F10 then type this in OOBE\BYPASSNRO and hit enter
For some people pressing Fn + Shift + F10 worked.
And after reboot the "I don't have Internet" option became available.
-
-
-
You'll now need to install the Framework Laptop Driver Bundle to get your laptop fully functional.
-
First, download the Driver Bundle for your Framework Laptop from here. If you haven't connected to a network yet, you'll need to download this on another system and then copy it over using a USB Flash Drive.
-
Navigate to the folder where the Framework Laptop Driver Bundle is, and double-click on it. Click Yes on the "Do you want to allow this app to make changes to your device?" prompt that comes up.
-
The Framework Laptop Driver Bundle will automatically install all of the drivers required to use the Framework Laptop. It will take several minutes to install. At the end of the install, you will be prompted to press any key to reboot. Press any key.
-
After the laptop reboots, you're done! You can connect to a network if you didn't do that earlier and also Activate Windows if you didn't enter a Product Key during installation.
-
Make sure to run Windows Update after you're connected to a network to get the latest security updates. In the future, you'll also be able to get driver and firmware updates through Windows Update.
-


- If you have any questions or concerns, feel free to reach out to Framework Support.
- If you have any questions or concerns, feel free to reach out to Framework Support.
Cancel: I did not complete this guide.
18 other people completed this guide.
2 Comments
The guide mentions creating a bootable USB drive using Microsoft's Media Creation Tool. For users who might prefer alternative methods, does Framework offer instructions or recommendations for creating a bootable USB drive using other tools like Rufus? <a href="https://www.richmondgeneralcontractors.c...">Richmond General Contractors</a>