Introduction
Once you have your Framework Laptop 13 set up following the Quick Start Guide, you’re ready to install your preferred OS. you’re ready to install your preferred OS. Ubuntu 26.04 works fantastically well.
Tools
No tools specified.
Parts
-
-
There is a known issue affecting folks doing a clean install of Ubuntu 26.04. We are working to drill down on the cause.
-
Our recommendation at this time to get past this issue is to verify your date is set correctly in the BIOS.
-
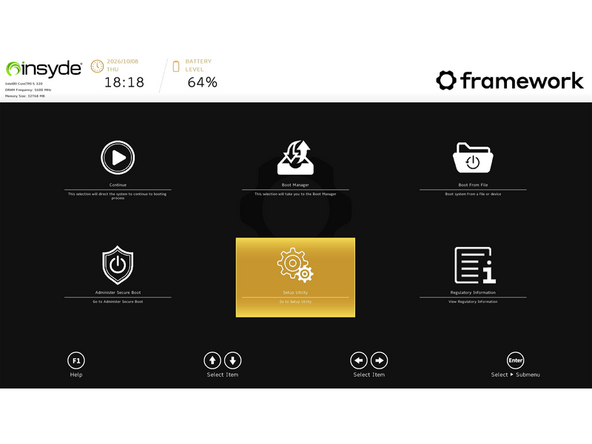
Power on your laptop, as you see the Framework logo splash screen, repeatedly tap the F2 key to bring up the BIOS settings.
-
Using your keyboard arrows, navigate over to Setup Utility. Click enter.
-
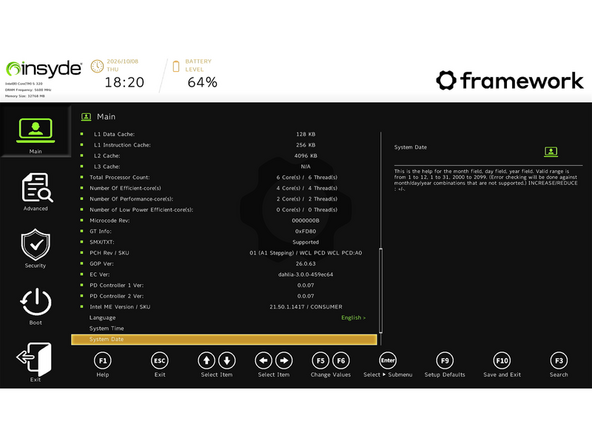
Next, you will be presented with what you see in the second image. Click the right arrow key, then arrow down until you see system date.
-
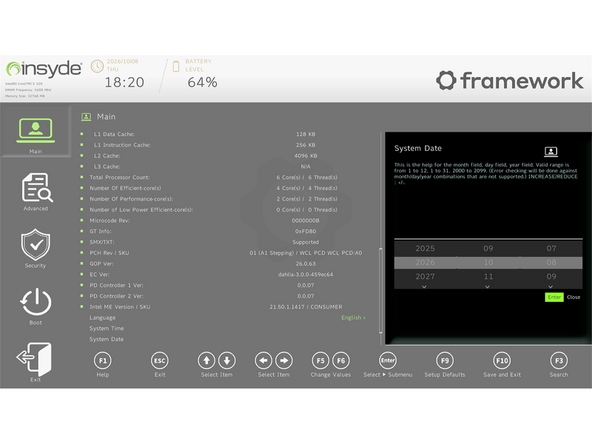
With the word "date" selected, click enter and follow the onscreen instructions to set the correct date.
-
Once you have the date set, click your F10 key and choose save changes.
-
-
-
First, download Ubuntu 26.04 Desktop image from Ubuntu's website. We'll go through the steps in this Guide assuming you have a simple installation scenario of a fresh install on a blank drive.
-
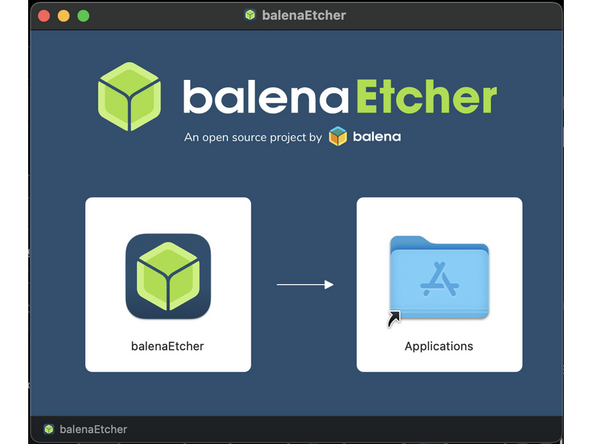
Download balenaEtcher as a tool to create the USB installer from the ISO. balenaEtcher is available for MacOS. Install it.
-
Before booting to the Live USB drive, a note about secure boot.
-
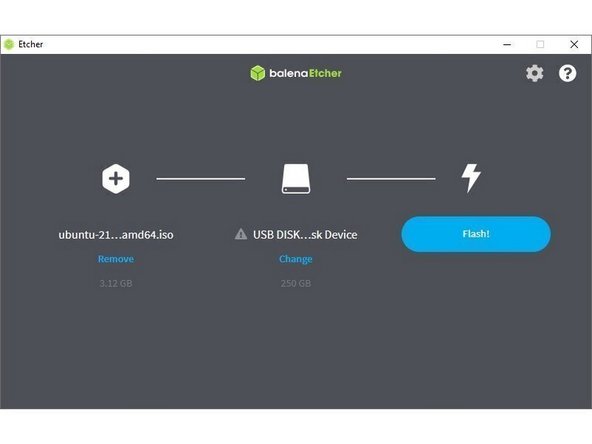
Launch balenaEtcher. Insert your USB drive (8GB or larger). Click on "Flash from file" and select the ubuntu-26.04-desktop-amd64.iso that you downloaded. Click on "Select target" and choose your USB drive. Click "Flash" and wait a minute or two for it to complete.
-
Once the USB drive creation is complete, you can close balenaEtcher and eject the USB drive from your OS.
-
-
-
This process will delete all data from the flash drive being used! Ensure any important data that may be kept on those drives is backed up before continuing.
-
First, download Ubuntu 26.04 Desktop image from Ubuntu's website. This guide will follow a basic setup that automatically uses the entire disk.
-
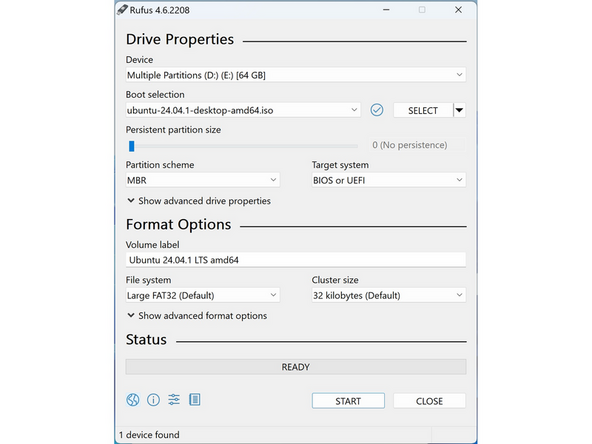
Download Rufus as a tool to create the USB installer from the ISO. The first item in this list will be a link to install installer for the latest version. Install Rufus using this.
-
Open Rufus, from the Device drop-down, select the USB flash drive stick.
-
In order to use devices like external hard drives, external solid state drives, or the Framework Storage Expansion Card to create a live USB, List USB Hard Drives must be enabled under Show advanced drive properties.
-
Use the Select Button next to Boot selection to choose the downloaded Ubuntu ISO.
-
Set Partition scheme to GPT to ensure the live USB is properly recognized at boot.
-
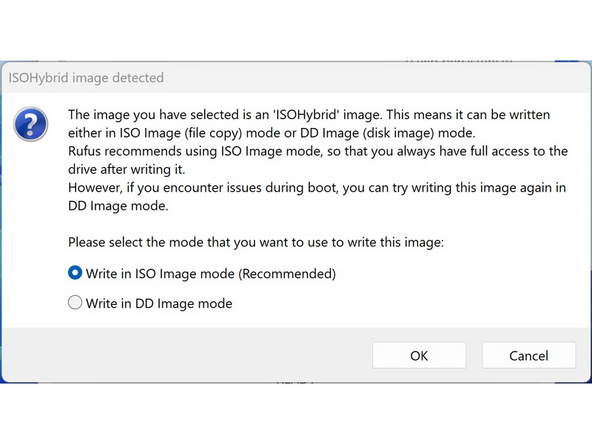
Click Start. A window will pop up to prompt for a choice between dd image mode and ISOHybrid image mode. Select ISOHybrid image mode then OK.
-
-
-
First, download Ubuntu 26.04 Desktop image from Ubuntu's website. We'll go through the steps in this Guide assuming you have a simple installation scenario of a fresh install on a blank drive.
-
Fedora: Media Writer is already installed on Workstation, so just launch it from the app menu. Meaning, you are creating Ubuntu USB install media, but creating the media from a Fedora installation elsewhere.
-
Other distro, Flatpak installed: Run flatpak install flathub org.fedoraproject.MediaWriter, then launch it from the app menu or with flatpak run org.fedoraproject.MediaWriter.
-
Other distro, no Flatpak (like Ubuntu being used for USB media creation): Install Flatpak and add Flathub per https://flathub.org/setup
-
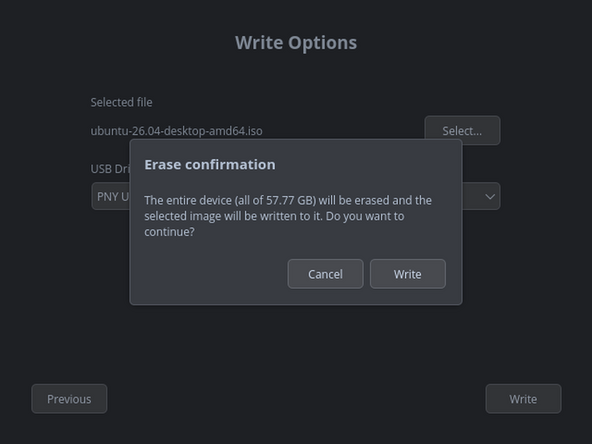
Insert an 8 GB+ USB key. Back up its contents first, since this erases the entire drive.
-
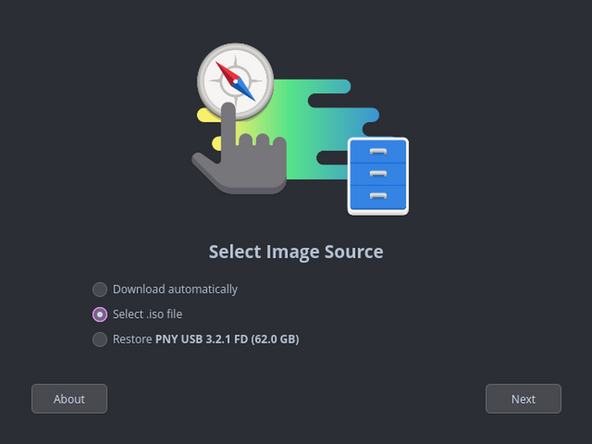
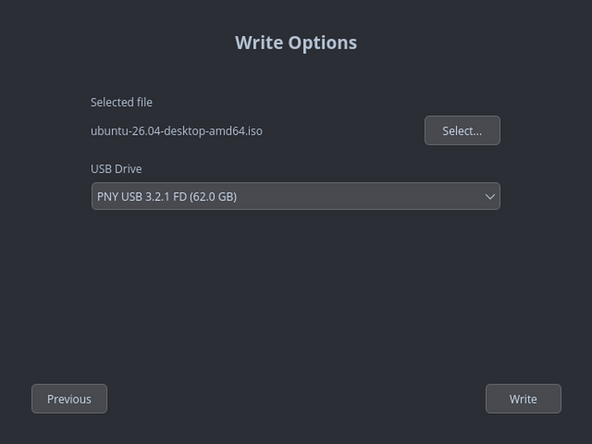
Open Fedora Media Writer, choose Select .iso file, and pick the Ubuntu 26.04 Desktop ISO you downloaded.
-
Select your USB drive from the device list, double-checking the name and size so you don't wipe the wrong disk.
-
Click Write, enter your password if prompted, wait for it to finish, then click Finish and safely eject the USB.
-
-
-
Ubuntu works with Secure Boot out of the box. Ubuntu Live USBs will boot regardless of whether or not it is disabled. Users who intend to dual-boot with Windows should not disable Secure Boot!
-
If a user has a reason to disable Secure Boot, such as specialized third party devices that require unsigned drivers:
-
Boot into BIOS by tapping F2 just before the Framework splash screen.
-
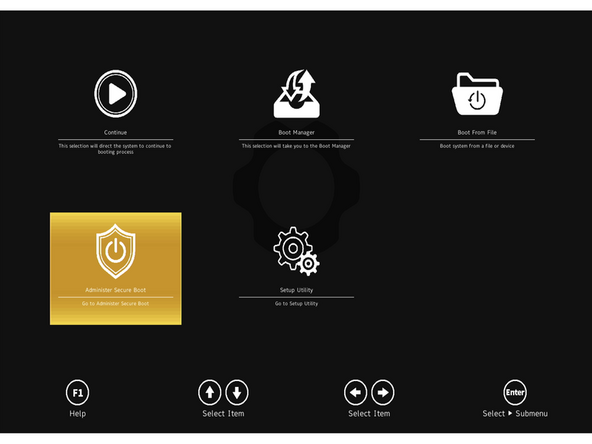
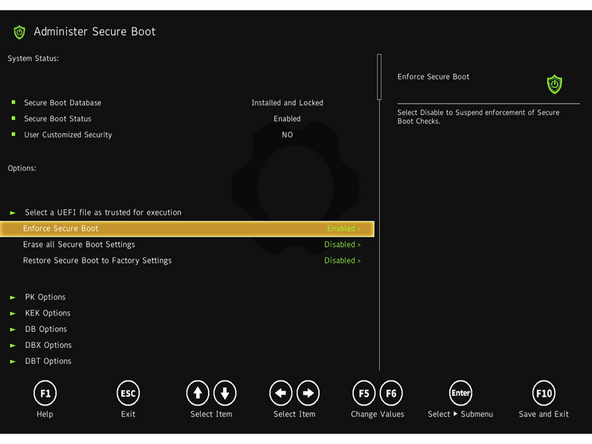
Arrow down to Administer Secure Boot. Press enter.
-
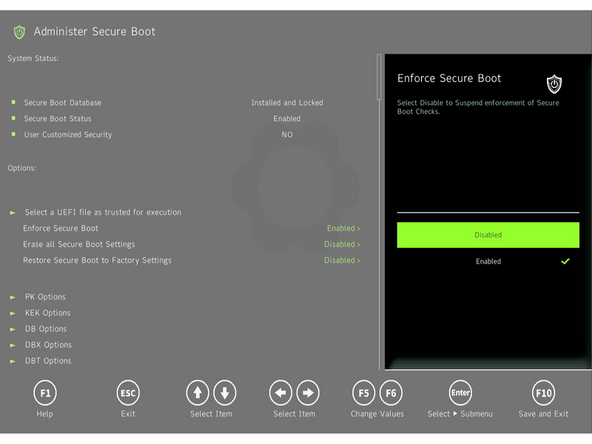
Arrow down to Enforce Secure Boot. Press enter, select Disabled, and press enter.
-
Press F10 to save and reboot. With Yes selected, press Enter.
-
To enable Secure Boot again, repeat the above steps but select Enable this time.
-
-
-
Boot to Live Ubuntu USB: Insert the USB drive into the powered-off machine, then power it on.
-
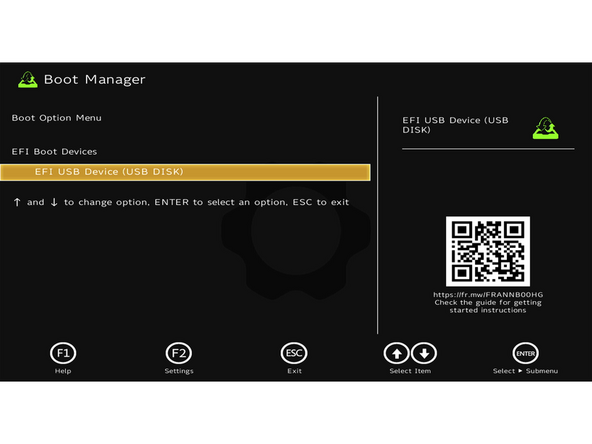
If an OS is already installed, immediately begin tapping F12 as soon as the power light comes on. Start tapping before the Framework logo appears.
-
At the Boot Option Menu, use arrow keys to select your USB drive (shown as "EFI USB Device (USB Disk)" or similar) and press Enter. On the black GRUB menu, confirm "Try or Install Ubuntu" is highlighted and press Enter.
-
If Windows is already installed on the system attempting to boot into a Linux Live USB may result in a "Device is Active" error. This will provide guidance to overcome this error.
-
Choose a language: Select English or another preferred language from the list. Click Next.
-
-
-
Language: Select your preferred language. Click next.
-
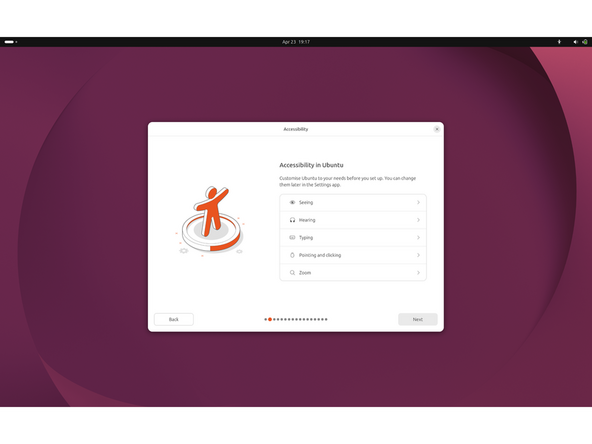
Accessibility: Adjust Seeing, Hearing, Typing, Pointing and clicking, or Zoom settings if needed. All accessibility options can be changed later in the Settings app. Click Next when done.
-
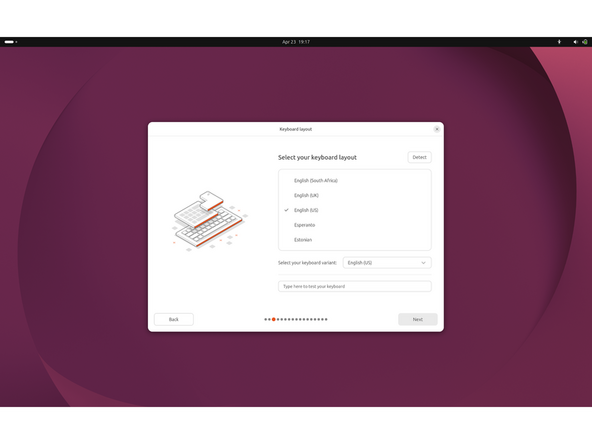
Keyboard layout: Select your keyboard layout from the list (default is English US). Choose a matching variant from the dropdown on the right. Test the layout in the "Type here to test your keyboard" field. Click Next.
-
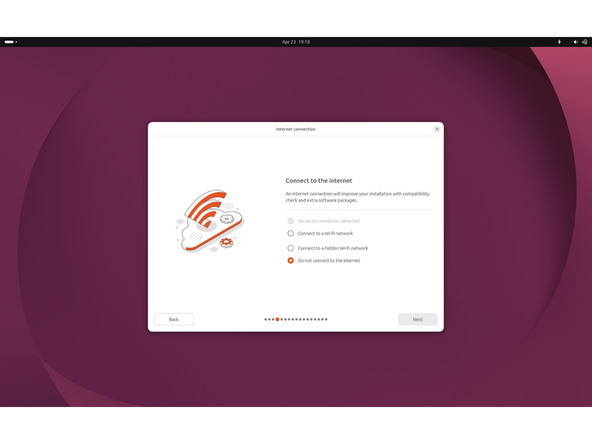
Internet connection: Choose wired connection, Wi-Fi network, hidden Wi-Fi network, or Do not connect. An internet connection improves the install with compatibility checks and extra software packages. Click Next.
-
-
-
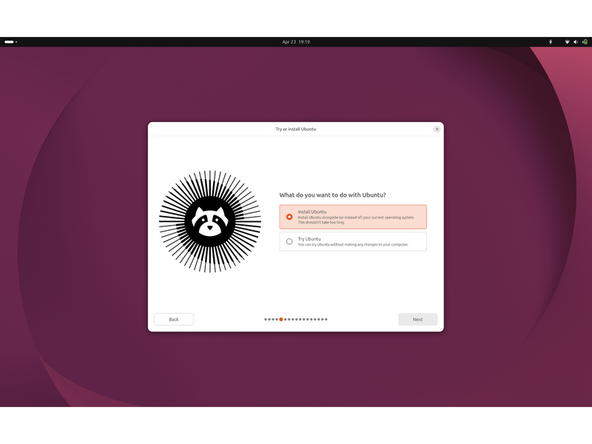
Try or install Ubuntu: Select "Install Ubuntu" to begin installation. Click Next.
-
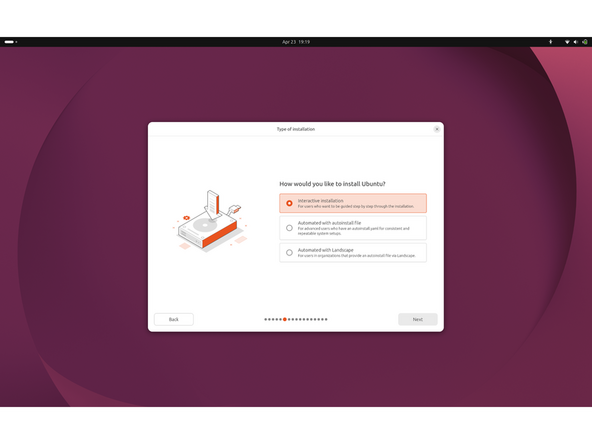
Type of installation: Select "Interactive installation" for the guided step-by-step setup. Click Next.
-
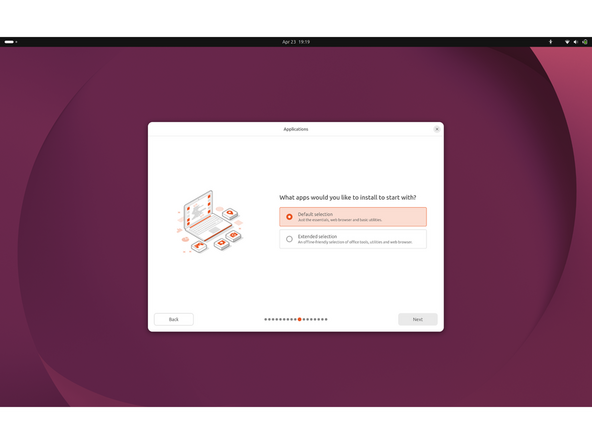
Applications: Select "Default selection" for essentials plus a web browser and basic utilities. Select "Extended selection" if you want an offline-friendly set of office tools included. Click Next.
-
-
-
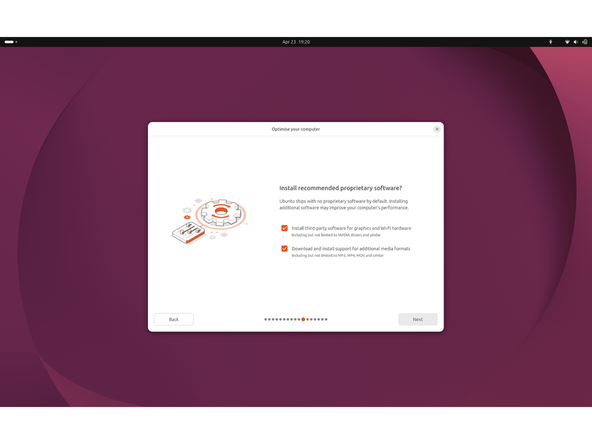
Optimize your computer: Check "Install third-party software for graphics and Wi-Fi hardware." Check "Download and install support for additional media formats" for MP3, MP4, MOV, and similar. Click Next.
-
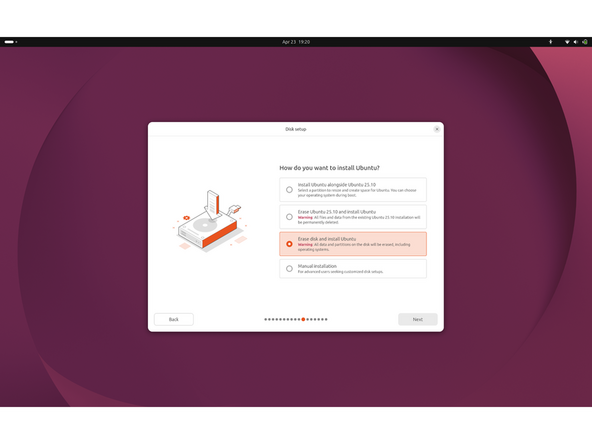
Disk setup: Select "Erase disk and install Ubuntu" for a clean install. Warning: this wipes all data and partitions on the target drive. Other options: install alongside an existing OS, erase only an existing Ubuntu install, or manual partitioning. Click Next.
-
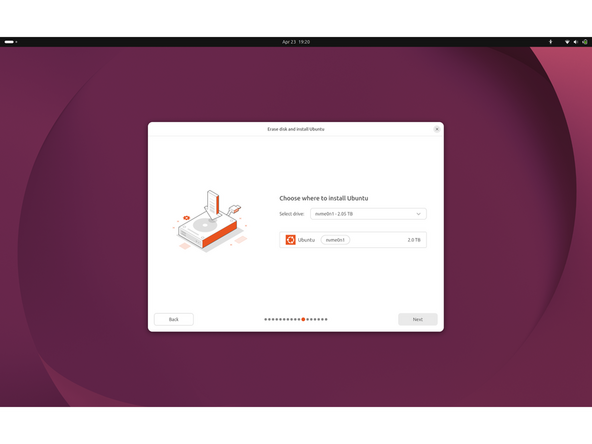
Choose the installation drive: Select the target drive from the "Select drive" dropdown, for example nvme0n1. Confirm the Ubuntu entry below shows the correct drive name and size. Click Next.
-
-
-
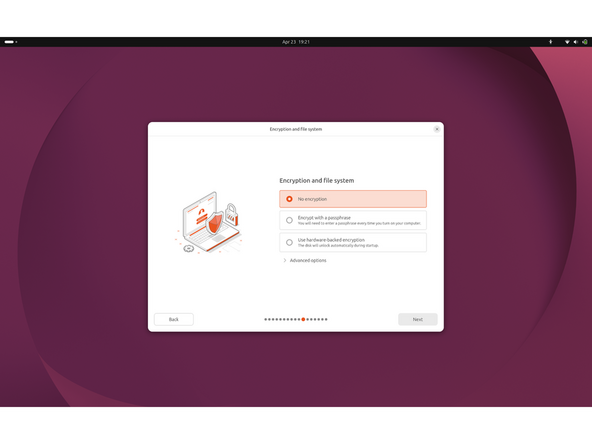
Encryption and file system: Select "No encryption" for an unencrypted install. Select "Encrypt with a passphrase" to require a passphrase at every boot. Select "Use hardware-backed encryption" to have the disk unlock automatically at startup. Click Next.
-
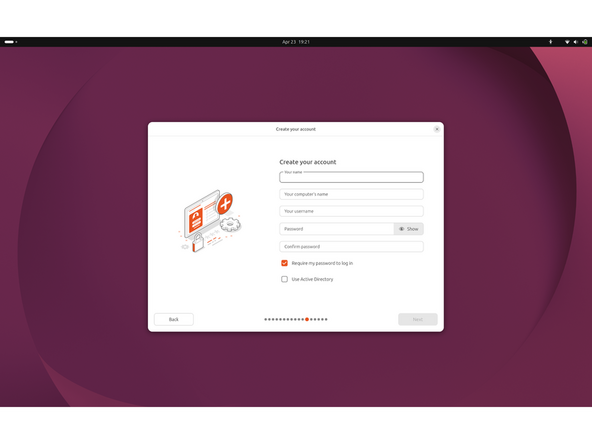
Create your account: Enter your name in the "Your name" field. Enter a hostname in the "Your computer's name" field. Enter a username in the "Your username" field.
-
Enter a password, then enter it again in the "Confirm password" field. Leave "Require my password to log in" checked unless you want auto-login. Check "Use Active Directory" only if joining an AD domain. Click Next.
-
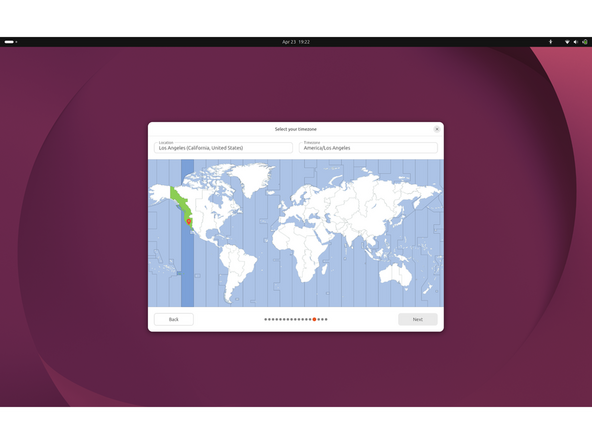
Select your timezone: Confirm the Location field matches your city or region. Confirm the Timezone field matches your zone. Click on the map to adjust if the values are wrong. Click Next.
-
-
-
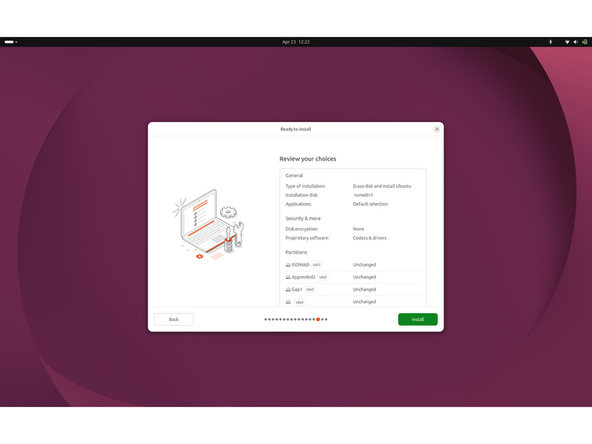
Review your choices: Verify Type of installation, Installation disk, and Applications under General. Verify Disk encryption and Proprietary software under Security & more. Verify the Partitions list. Click Install to begin.
-
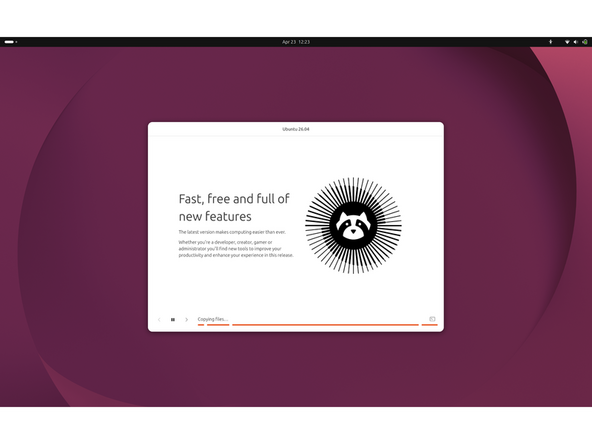
Installation runs: The installer copies files and displays a slideshow while it works. When finished, you will be prompted to remove the USB and reboot.
-
-
-
Remove the USB and reboot: When the installer finishes, click "Restart now" in the dialog. When prompted with "Please remove the installation medium, then press ENTER," unplug the USB drive. Press Enter to reboot into the installed system.
-
First boot - log in: At the GDM login screen, click your username. Enter the password you set during installation. Press Enter or click Sign In.
-
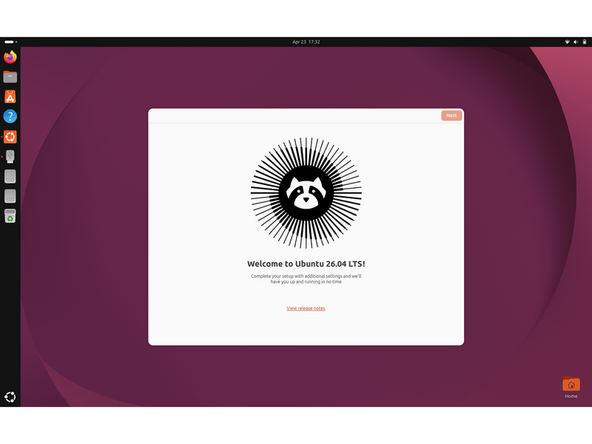
Welcome to Ubuntu: The setup assistant opens with "Welcome to Ubuntu 26.04 LTS!" Click "View release notes" if you want to read what's new. Click Next to continue.
-
Location Services: Toggle "Location Services" on if you want apps to determine your geographical location. Leave it off to keep location access disabled. Click Next. This can be changed later in the Settings app.
-
Help Improve Ubuntu: Toggle "Share system data with the Ubuntu team" on or off (hardware info, language, timezone). Toggle "Share error reports with the Ubuntu team" on or off (crash reports and related system logs).
-
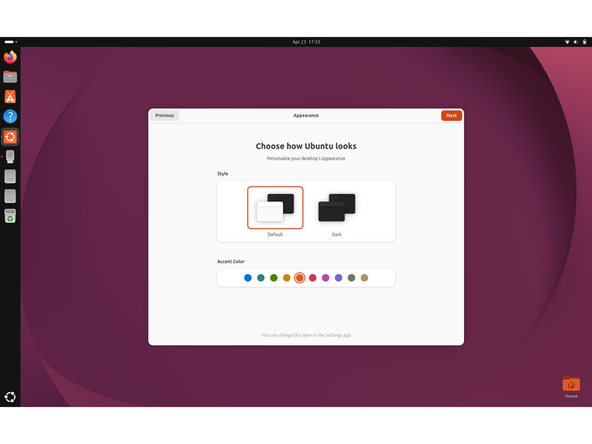
Appearance: Select "Default" for a light window style or "Dark" for a dark window style. Choose an accent color from the row of colored circles. Click Next. This can be changed later in the Settings app.
-
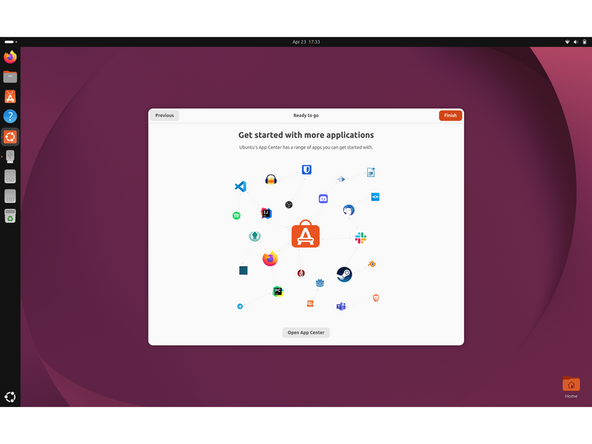
Ready to go: The final "Get started with more applications" screen appears. Click "Open App Center" to browse additional apps now, or skip it. Click Finish to close the setup assistant.
-
-
-
Click here for the completion guide for the Framework Laptop 13.
-
Our recommendations for Optimizing Ubuntu Battery Life. This includes important expansion card behavior.
-
Important expansion card behavior.
-
-
-
How to check the BIOS version. Go to and click upper left corner where you see the horizontal line, search terminal and launch it. Please follow this link to copy and paste the code into your terminal, then press enter. The output will tell you which Framework Laptop 13 you have and also which BIOS version you're using.
-
If you have Intel 11th Gen Intel Core, you can check here for the latest firmware.
-
If you have Intel 12th Gen Intel Core, you can check here for the latest firmware.
-
If you have Intel 13th Gen Intel Core, you can check here for the latest firmware.
-
If you have AMD Ryzen 7040 Series, you can check here for the latest firmware.
-
If you have Intel Core Ultra Series 1, you can check here for the latest firmware.
-
If you have AMD Ryzen AI 300 Series, you can check here for the latest firmware.
-
-
-
Expecting two-finger right clicking and need help? The touchpad help guide is here.
-
Please visit our troubleshooting guide first.
-
If you need additional help, feel free to visit our active support community.
-
Enjoy using Ubuntu on your Framework Laptop 13! If you have any questions or run into any issues, we recommend bringing them to the Community in the Framework Laptop 13 Linux tag.. Members of the Framework team participate in discussions there.
Enjoy using Ubuntu on your Framework Laptop 13! If you have any questions or run into any issues, we recommend bringing them to the Community in the Framework Laptop 13 Linux tag.. Members of the Framework team participate in discussions there.