
Introduction
Once you have your Framework Laptop 16 set up following the Quick Start Guide, you’re ready to install your preferred OS. With the latest release of NixOS, everything works pretty smoothly. You can check our Linux page for additional Linux compatibility notes.
NOTE: This is a Compatible Community Supported Linux Distribution. Learn more here.
Tools
No tools specified.
Parts
-
-
First, download NixOS from NixOS' website. NixOS has a detailed installation guide that you can follow. We'll go through the steps in this Guide assuming you have a simple installation scenario of a fresh install on a blank drive.
-
Download balenaEtcher as a tool to create the USB installer from the ISO. balenaEtcher is available for MacOS. Install it.
-
Launch balenaEtcher. Insert your USB drive (8GB or larger). Click on "Flash from file" and select the NixOS iso that you downloaded. Click on "Select target" and choose your USB drive. Click "Flash" and wait a minute or two for it to complete.
-
Once the USB drive creation is complete, you can close balenaEtcher and eject the USB drive from your OS.
-
-
-
First, download NixOS from the NixOS website. NixOS has a detailed installation guide that users can follow. This Guide will walk through a basic setup that automatically uses an entire disk.
-
Download Rufus as a tool to create the USB installer from the ISO. The first item in this list will be a link to install installer for the latest version. Install Rufus using this.
-
Open Rufus, from the Device drop-down, select the USB flash drive stick.
-
In order to use devices like external hard drives, external solid state drives, or the Framework Storage Expansion Card to create a live USB, List USB Hard Drives must be enabled under Show advanced drive properties.
-
Use the Select Button next to Boot selection to choose the downloaded NixOS ISO.
-
Set Partition scheme to GPT to ensure the live USB is properly recognized at boot.
-
Click Start. A window will pop up to prompt for a choice between dd image mode and ISOHybrid image mode. Select ISOHybrid image mode then OK.
-
-
-
Before we begin the installation process with the Live USB, let's make sure you have your Linux Audio Compatibility set to Linux in the BIOS. Explanation as to what this does can be found here.
-
Power on the laptop, repeatedly tapping F2 in order to get into the BIOS. Note: If you're having trouble with this, try again, holding down the Fn key while rapidly tapping F2.
-
In BIOS mode, arrow key over to Setup Utility. Press the enter key. Arrow down to Advanced. Then arrow right, then arrow down to Linux Audio Compatibility. Press enter.
-
A new box for Linux Audio Compatibility will appear, arrow to Linux, then press enter. Now press F10 key to reboot.
-
Now we don't have an OS installed yet. So the reboot won't get us to a running operating system and we fully expect to see an error to this point. Simply press the power button to shutdown.
-
The next step is to install NixOS.
-
-
-
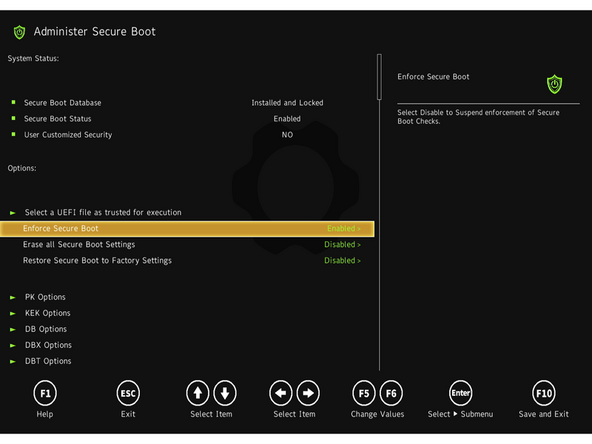
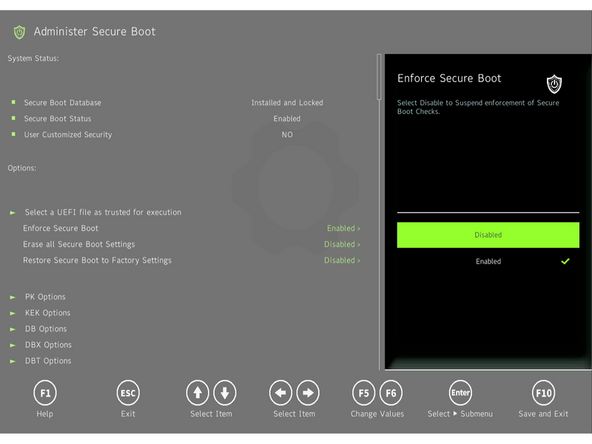
To install NixOS, Secure Boot must be disabled! By default NixOS will not boot with Secure Boot enabled. Please refer to our explanation of Secure Boot to learn more
-
To disable secure boot:
-
Boot into BIOS by tapping F2 just before the Framework splash screen.
-
Arrow down to Administer Secure Boot. Press enter.
-
Arrow down to Enforce Secure Boot. Press enter, select Disabled, and press enter.
-
Press F10 to save and reboot. With Yes selected, press Enter.
-
To enable Secure Boot again, repeat the above steps but select Enable this time.
-
-
-
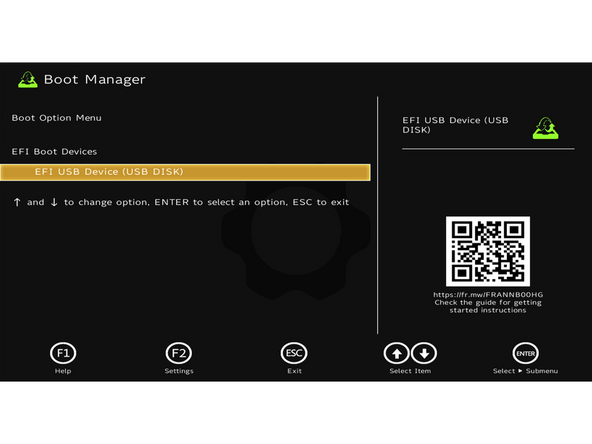
Insert the USB drive into the powered off Framework Computer, and then power on. Immediately after the power light comes on begin tapping the F12 key before the Framework logo is visible.
-
If the computer does not have an existing OS installed, tapping F12 is not necessary and the system will automatically boot the Live USB.
-
Use the arrows to select the Live USB, typically named "EFI USB Device (USB Disk)" and press enter to boot from it.
-
Hit Enter again to boot into and install NixOS.
-
-
-
When the installer first displays a list of kernels to choose from, select the latest one. At the time of this guide, that was kernel 6.16.x - for the sake of this guide, we will assume you've selected GNOME.
-
When the installer appears, you will be asked to connect to a network. Connect to wi-fi. It will cycle through the checking process again, then allow you to select your language and press the next button.
-
Select your location keyboard and then setup your user account.
-
Next, you will want to choose your desktop - as mentioned previously, for the sake of this guide, we will assume GNOME.
-
-
-
Next you will be asked if you would like to have access to non-free software. This is recommended for most users, but if you understand it can affect access to proprietary blobs and related, you can elect to not choose it.
-
The next option is to choose your partition setup. For most people, the desired choice will be to erase disk. Advanced users, may instead elect for manual partitioning.
-
And now, we arrive at the summary screen where you can determined if the settings are what you would like. And you can press the install button to begin writing your selections to the drive.
-
-
-
Follow these steps to get the rest of your configuration setup. This includes hardware modules and tablet mode configuration.
-
AMD Ryzen 7040 Series: It is recommended to use power-profiles-daemon over tlp for the AMD framework. NixOS Hardware module for flakes: nixos-hardware.nixosModules.framework-16-7040-amd NixOS Hardware module for channels:
<nixos-hardware/framework/16-inch/7040-amd> -
AMD Ryzen AI 300: AMD Ryzen 7040 Series: It is recommended to use power-profiles-daemon over tlp for the AMD framework. NixOS Hardware module for channels:
<nixos-hardware/framework/16-inch/amd-ai-300-series> -
If you have an NVIDIA dGPU module, you can enable it via the NVIDIA open drivers:
-
services.xserver.videoDrivers = [ "nvidia" ]; hardware.nvidia.open = true; # see the note above
-
-
-
Your Framework Laptop 16 with the NVIDIA dGPU module can operate in two primary graphics modes you will want to explore. You can switch between them in your laptop's BIOS settings.
-
To access this section of your BIOS: Tap F2 when you boot and see your Framework Splash screen (Framework logo). Arrow over to Setup utility. Click enter. Down arrow to Advanced on the left side. Right arrow to NVIDIA Mux. Enter key. Make your selection, press enter. Press F10 and press enter again to save changes and reboot.
-
The third option, Advanced Optimus, behaves like NVIDIA Hybrid Mode on Linux. So we will forgo it for this guide.
-
NVIDIA Hybrid Mode (Traditional Optimus): This is the default and most battery-efficient mode.
-
Display Path: The integrated AMD GPU (iGPU) is always connected to the display. When the NVIDIA GPU (dGPU) is used for a demanding task, it renders the frames and copies them to the iGPU to be shown on the screen.
-
Switching: Applications run on the power-saving iGPU by default. Steam uses dGPU this automatically for games.
-
Performance: Small but measurable latency and FPS penalty compared to direct dGPU output because every frame must traverse the iGPU.
-
Power Behavior: The iGPU remains on at all times. The dGPU powers up only when needed and typically idles around 4–6 W (P8 power state). This is the most battery-efficient configuration.
-
-
-
Your Framework Laptop 16 with the NVIDIA dGPU module can operate in two primary graphics modes you will want to explore. You can switch between them in your laptop's BIOS settings.
-
To access this section of your BIOS: Tap F2 when you boot and see your Framework Splash screen (Framework logo). Arrow over to Setup utility. Click enter. Down arrow to Advanced on the left side. Right arrow to NVIDIA Mux. Enter key. Make your selection, press enter. Press F10 and press enter again to save changes and reboot.
-
The third option, Advanced Optimus, behaves like NVIDIA Hybrid Mode on Linux. So we will forgo it for this guide.
-
NVIDIA GPU-Only (Discrete Mode)
-
Display Path The dGPU drives the panel 100% of the time. The iGPU is fully disabled.
-
Switching: No switching possible without reboot — you must go back into BIOS or flip the MUX manually to return to Hybrid mode.
-
Performance: Maximum performance and lowest latency, because there is no iGPU in the pipeline.
-
Power Behavior Highest power draw. The dGPU cannot power down and battery life is significantly shorter, even at idle.
-
-
-
How to check the BIOS version. Go to and click upper left corner where you see the horizontal line, search terminal and launch it. Please follow the step below:
-
nix-shell -p lshw dmidecode --run "clear && sudo dmidecode | grep -A3 'Vendor:\|Product:' && sudo lshw -C cpu | grep -A3 'product:\|vendor:'"
-
For Framework Laptop 16 AMD Ryzen 7040 Series, you can check here for the latest firmware.
-
For Framework Laptop 16 AMD Ryzen™ AI 300 Series, you can check here for the latest firmware.
-
IMPORTANT: Per the instructions above, we do NOT recommend updating BIOS and firmware using various GUIs. We recommend using fwupdmgr as provided in the step above. Using GUIs can potentially create issues that would not be present using fwupdmgr directly.
-
-
-
If you need additional help, feel free to visit our active support community.
-
We also recommend this amazing newcomer guide for NixOS newcomers called Zero to Nix.
-


Enjoy using NixOS on your Framework Laptop 16! If you have any questions or run into any issues, we recommend bringing them to the Community in the Linux NixOS topic. Members of the Framework team participate in discussions there.
Enjoy using NixOS on your Framework Laptop 16! If you have any questions or run into any issues, we recommend bringing them to the Community in the Linux NixOS topic. Members of the Framework team participate in discussions there.

2 Comments
(continued because of the limit on comment length)
Suggested validation steps for hybrid/offload:
glxinfo -B # should show AMD by default
nvidia-offload glxinfo -B # should show NVIDIA
cat /sys/bus/pci/devices/.../power/runtime_status # should be "suspended" at idle
(Note: running nvidia-smi can wake the GPU, so it's not a reliable "is it sleeping?" check.)
Also: Step 8 currently contains a small typo/duplication ("AMD Ryzen AI 300: AMD Ryzen 7040 Series:").
Suggestion for Step 8 ("Finish Setup"):
For Ryzen AI 300 + NVIDIA dGPU module (RTX 5070), it would be clearer to recommend the maintained nixos-hardware module
nixos-hardware.nixosModules.framework-16-amd-ai-300-series-nvidia
instead of only:
services.xserver.videoDrivers = [ "nvidia" ]; hardware.nvidia.open = true;
The nixos-hardware ...-nvidia module enables PRIME offload + provides the nvidia-offload <command> wrapper (hybrid mode: AMD iGPU default, NVIDIA on demand), and enables NVIDIA hybrid power management.
Important missing note: users MUST override PRIME PCI bus IDs for their own system (FW16 modular design means bus IDs can vary depending on expansion cards and NVMe layout). Example:
imports = [ nixos-hardware.nixosModules.framework-16-amd-ai-300-series-nvidia ];
hardware.nvidia.prime = {
amdgpuBusId = "PCI:<...>:<...>:<...>";
nvidiaBusId = "PCI:<...>:<...>:<...>";
};
How to find bus IDs:
lspci | grep -E "VGA|3D|Display"
Then convert hex bus/device to decimal (e.g. c1:00.0 -> PCI:193:0:0).