Introduction
Once you have your Framework Laptop 12 set up following the Quick Start Guide, you’re ready to install your preferred OS. With the latest release of NixOS, everything works pretty smoothly. You can check our Linux page for additional Linux compatibility notes.
NOTE: This is a Compatible Community Supported Linux Distribution. Learn more here.
Tools
No tools specified.
Parts
-
-
First, download NixOS from NixOS' website. NixOS has a detailed installation guide that you can follow. We'll go through the steps in this Guide assuming you have a simple installation scenario of a fresh install on a blank drive.
-
Download balenaEtcher as a tool to create the USB installer from the ISO. balenaEtcher is available for MacOS. Install it.
-
Before booting to the Live USB drive, a note about secure boot.
-
Launch balenaEtcher. Insert your USB drive (8GB or larger). Click on "Flash from file" and select the NixOS iso that you downloaded. Click on "Select target" and choose your USB drive. Click "Flash" and wait a minute or two for it to complete.
-
Once the USB drive creation is complete, you can close balenaEtcher and eject the USB drive from your OS.
-
-
-
First, download NixOS from NixOS' website. NixOS has a detailed installation guide that you can follow. We'll go through the steps in this Guide assuming you have a simple installation scenario of a fresh install on a blank drive.
-
Download Rufus as a tool to create the USB installer from the ISO - select the top download option from the link provided. Rufus is available for Windows. Install it.
-
Before booting to the Live USB drive, a note about secure boot.
-
If you are removing Windows to install Linux, you may run into the "Device is Active" error. This will provide you with guidance to overcome this error.
-
Launch Rufus. Insert your USB drive (8GB or larger). Click on "Flash from file" and select the NixOS iso that you downloaded. Click on "SELECT" and choose your USB drive. Click "START" and wait a minute or two for it to complete.
-
-
-
Secure Boot is optional: Enabling secure boot is completely optional and not necessary for normal operation, it's a personal choice. Follow this link if you wish to enable it before installing NixOS. More about secure boot here.
-
Insert the USB drive into your powered off Framework Laptop 12, and then power on. If you have an existing OS installed on the Storage drive in your laptop, immediately after the power light comes on begin rapidly tapping (continuously ) the F12 key - you must begin tapping well before you see the Framework logo.
-
If you don't have an internal storage drive installed or it is blank, the laptop will boot to the USB drive directly.
-
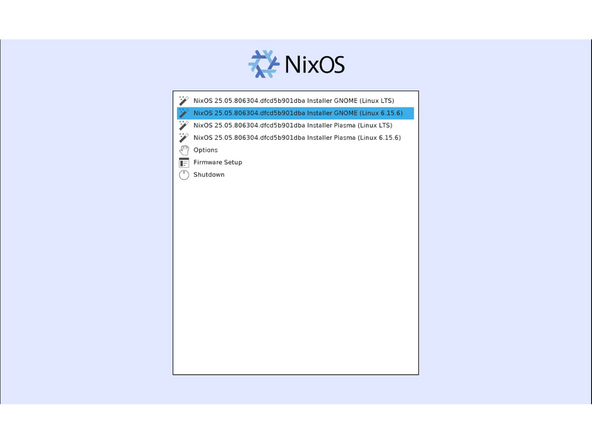
Hit Enter again to boot into and install NixOS.
-
-
-
When the installer first displays a list of kernels to choose from, select the latest one. At the time of this guide, that was kernel 6.15.x - for the sake of this guide, we will assume you've selected GNOME.
-
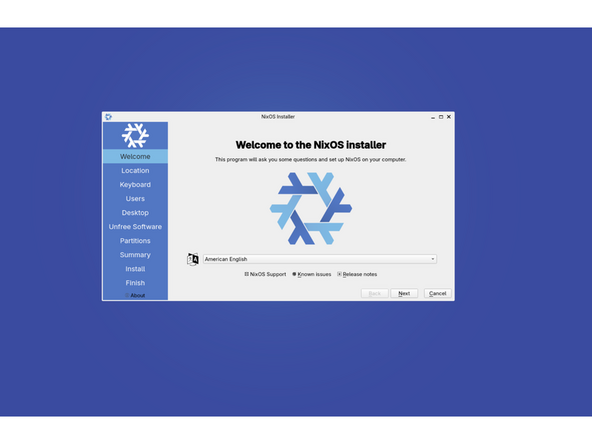
When the installer appears, you will be asked to connect to a network. Connect to wi-fi. It will cycle through the checking process again, then allow you to select your language and press the next button.
-
Select your location keyboard and then setup your user account.
-
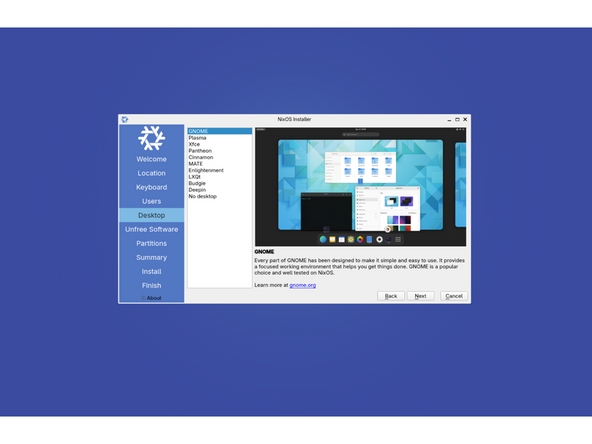
Next, you will want to choose your desktop - as mentioned previously, for the sake of this guide, we will assume GNOME.
-
-
-
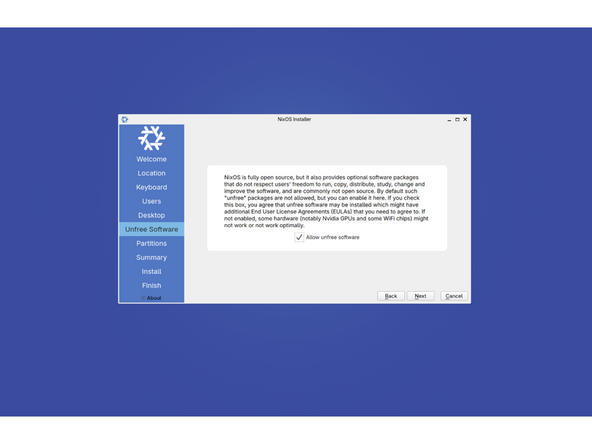
Next you will be asked if you would like to have access to non-free software. This is recommended for most users, but if you understand it can affect access to proprietary blobs and related, you can elect to not choose it.
-
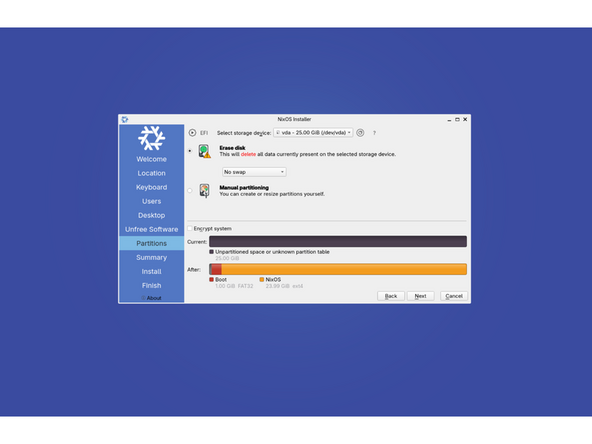
The next option is to choose your partition setup. For most people, the desired choice will be to erase disk. Advanced users, may instead elect for manual partitioning.
-
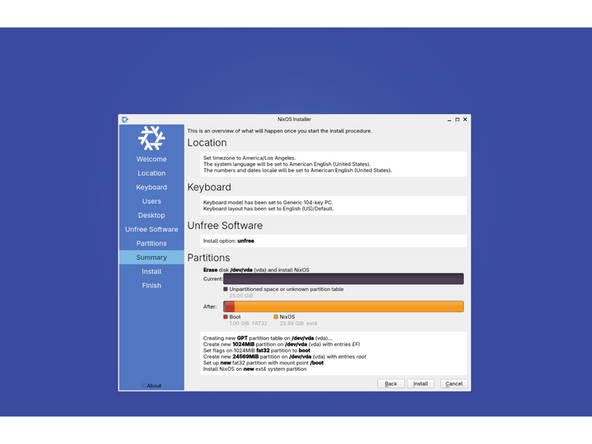
And now, we arrive at the summary screen where you can determined if the settings are what you would like. And you can press the install button to begin writing your selections to the drive.
-
-
-
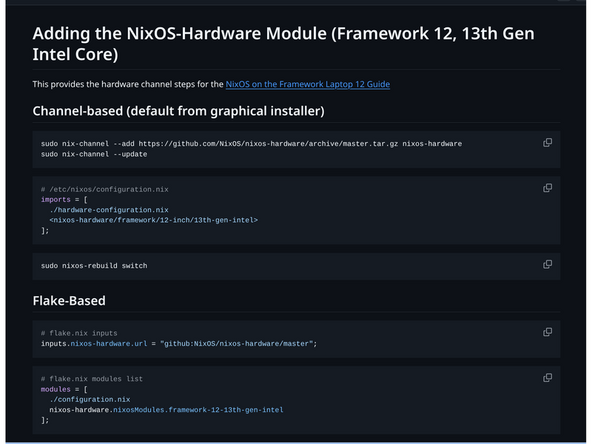
Framework hardware quirks and fixes for NixOS are maintained in the nixos-hardware project, which isn't part of NixOS by default. Add the module for your CPU generation.
-
Add the channel to make sure full functionality is in place:
-
Framework hardware quirks and fixes for NixOS are maintained in the nixos-hardware project. For the exact commands to add the module, covering both channel-based (default installer) and flake-based setups, please see our reference guide linked here.
-
The above link provides for channel-based or flake-based inclusion, depending on your preference.
-
Enabling the accelerometer and tablet mode. Instructions provided here.
-
-
-
How to check the BIOS version. Go to and click upper left corner where you see the horizontal line, search terminal and launch it. Please follow the step below:
-
nix-shell -p lshw dmidecode --run "clear && sudo dmidecode | grep -A3 'Vendor:\|Product:' && sudo lshw -C cpu | grep -A3 'product:\|vendor:'"
-
The output will tell you which Framework Laptop 12 you have and also which BIOS version you're using.
-
Framework Laptop 12 BIOS and Driver Releases (13th Gen Intel Core), click here for the latest firmware.
-
You may also check this page for EFI options for updates for the BIOS as well.
-
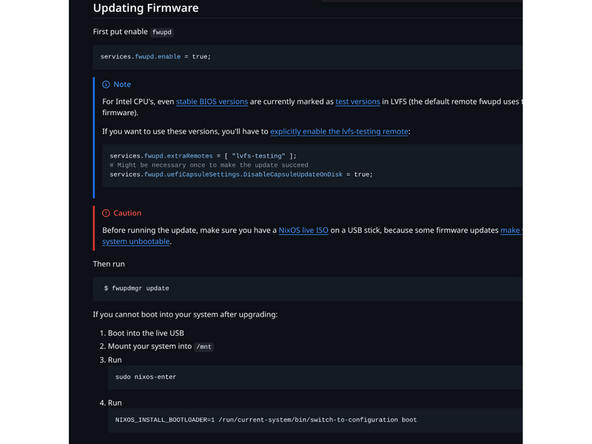
IMPORTANT: Per the instructions above, we do NOT recommend updating BIOS and firmware using various GUIs. We recommend using fwupdmgr as provided in the step above. Using GUIs can potentially create issues that would not be present using fwupdmgr directly.
-
-
-
If you need additional help, feel free to visit our active support community.
-
We also recommend this amazing newcomer guide for NixOS newcomers called Zero to Nix.
-


Enjoy using NixOS on your Framework Laptop 12! If you have any questions or run into any issues, we recommend bringing them to the Community in the Linux NixOS topic. Members of the Framework team participate in discussions there.
Enjoy using NixOS on your Framework Laptop 12! If you have any questions or run into any issues, we recommend bringing them to the Community in the Linux NixOS topic. Members of the Framework team participate in discussions there.