Introduction
Once you have your Framework Desktop set up following the Quick Start Guide, you’re ready to install your preferred OS. With the latest release of NixOS, everything works pretty smoothly. You can check our Linux page for additional Linux compatibility notes.
NOTE: This is a Compatible Community Supported Linux Distribution. Learn more here.
Tools
No tools specified.
Parts
-
-
First, download NixOS from NixOS' website. NixOS has a detailed installation guide that you can follow. We'll go through the steps in this Guide assuming you have a simple installation scenario of a fresh install on a blank drive.
-
Download balenaEtcher as a tool to create the USB installer from the ISO. balenaEtcher is available for MacOS. Install it.
-
Before booting to the Live USB drive, a note about secure boot.
-
Launch balenaEtcher. Insert your USB drive (8GB or larger). Click on "Flash from file" and select the NixOS iso that you downloaded. Click on "Select target" and choose your USB drive. Click "Flash" and wait a minute or two for it to complete.
-
Once the USB drive creation is complete, you can close balenaEtcher and eject the USB drive from your OS.
-
-
-
First, download NixOS from the NixOS website. NixOS has a detailed installation guide that users can follow. This Guide will walk through a basic setup that automatically uses an entire disk.
-
Download Rufus as a tool to create the USB installer from the ISO. The first item in this list will be a link to install installer for the latest version. Install Rufus using this.
-
Open Rufus, from the Device drop-down, select the USB flash drive stick.
-
In order to use devices like external hard drives, external solid state drives, or the Framework Storage Expansion Card to create a live USB, List USB Hard Drives must be enabled under Show advanced drive properties.
-
Use the Select Button next to Boot selection to choose the downloaded NixOS ISO.
-
Set Partition scheme to GPT to ensure the live USB is properly recognized at boot.
-
Click Start. A window will pop up to prompt for a choice between dd image mode and ISOHybrid image mode. Select ISOHybrid image mode then OK.
-
-
-
To install NixOS, Secure Boot must be disabled! By default NixOS will not boot with Secure Boot enabled. Please refer to our explanation of Secure Boot to learn more
-
To disable secure boot:
-
Boot into BIOS by tapping F2 just before the Framework splash screen.
-
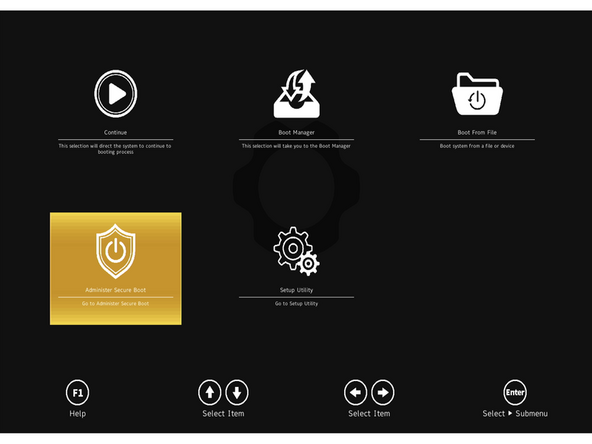
Arrow down to Administer Secure Boot. Press enter.
-
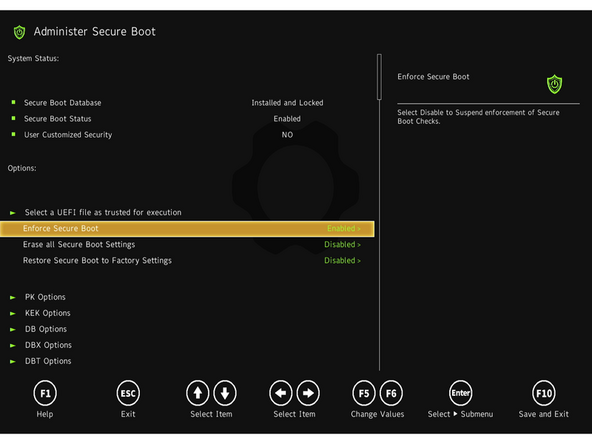
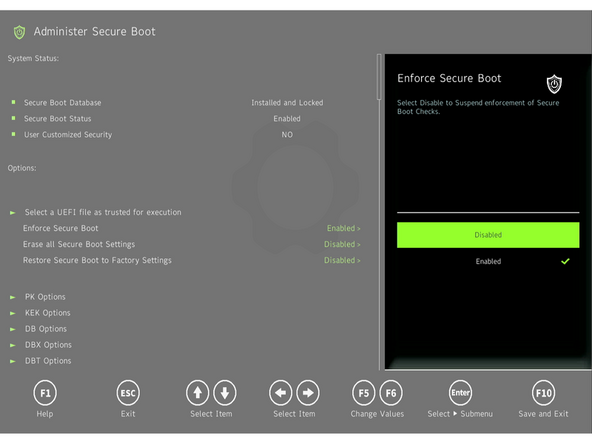
Arrow down to Enforce Secure Boot. Press enter, select Disabled, and press enter.
-
Press F10 to save and reboot. With Yes selected, press Enter.
-
To enable Secure Boot again, repeat the above steps but select Enable this time.
-
-
-
Insert the USB drive into the powered off Framework Computer, and then power on. Immediately after the power light comes on begin tapping the F12 key before the Framework logo is visible.
-
If the computer does not have an existing OS installed, tapping F12 is not necessary and the system will automatically boot the Live USB.
-
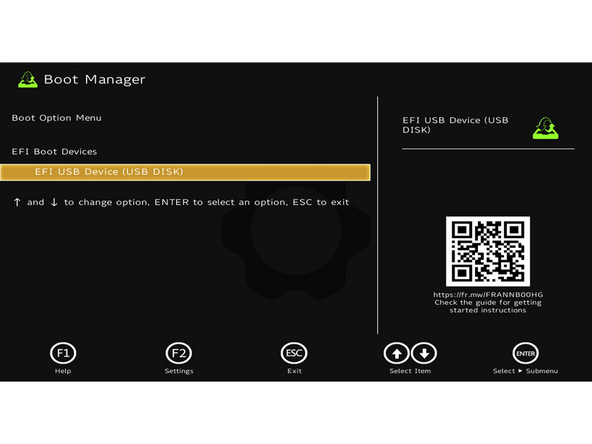
Use the arrows to select the Live USB, typically named "EFI USB Device (USB Disk)" and press enter to boot from it.
-
Hit Enter again to boot into and install NixOS.
-
-
-
Secure Boot is optional: Enabling secure boot is completely optional and not necessary for normal operation, it's a personal choice. Follow this link if you wish to enable it before installing NixOS. More about secure boot here.
-
Insert the USB drive into your powered off Framework Desktop, and then power on. If you have an existing OS installed on the Storage drive in your desktop, immediately after the power light comes on begin rapidly tapping (continuously ) the F12 key - you must begin tapping well before you see the Framework logo.
-
If you don't have an internal storage drive installed or it is blank, the desktop will boot to the USB drive directly.
-
Hit Enter again to boot into and install NixOS.
-
This is a distribution of Linux is unique compared to other distros and follows its own conventions. So you will want to utilize the NixOS install guide to get your bearings on how to install it.
-
-
-
The NixOS Wiki configuration knowledge base from the NixOS Community.
-
At this time, there is nothing added to the NixOS KB linked above. this may change in the future. Check back here for updates.
-
-
-
How to check the BIOS version. Go to and click upper left corner where you see the horizontal line, search terminal and launch it. Please follow the step here: nix-shell -p lshw dmidecode --run "clear && sudo dmidecode | grep -A3 'Vendor:\|Product:' && sudo lshw -C cpu | grep -A3 'product:\|vendor:'"
-
Framework Desktop firmware update link will appear here when it's ready.
-
IMPORTANT: Per the instructions above, we do NOT recommend updating BIOS and firmware using various GUIs. We recommend using fwupdmgr as provided in the step above. Using GUIs can potentially create issues that would not be present using fwupdmgr directly.
-
-
-
If you need additional help, feel free to visit our active support community.
-


Enjoy using NixOS on your Framework Desktop! If you have any questions or run into any issues, we recommend bringing them to the Community in the Linux NixOS topic. Members of the Framework team participate in discussions there.
Enjoy using NixOS on your Framework Desktop! If you have any questions or run into any issues, we recommend bringing them to the Community in the Linux NixOS topic. Members of the Framework team participate in discussions there.
Cancel: I did not complete this guide.
One other person completed this guide.