
Introduction
Once you have your Framework Laptop 12 set up following the Quick Start Guide, you’re ready to install your preferred OS. The Framework Laptop 12 is running some very recent hardware, and we’ve worked with the team at Bazzite to improve support. Bazzite is one of the Linux distributions we recommend, as it has full hardware support with very little setup required, and it offers a great user experience overall.
This is an Officially Supported Linux Distribution. Learn more here.
Tools
Parts
No parts specified.
-
-
This guide is for the Bazzite (KDE Plasma) on both Framework Laptop 12 (13th Gen Intel® Core™ and Intel® Core™ Series 3).
-
-
-
First, download the latest Bazzite release from the Bazzite website. We'll go through the steps in this Guide assuming a simple installation scenario of a fresh install on a blank drive.
-
At the top of Bazzite page upper right, click on the Download Bazzite button.
-
Next, select on Desktop or Laptop. The select Intel/AMD. Choose KDE (we recommend the KDE Plasma option). Lastly, select the Download Bazzite button under New Users. This will download your ISO for Bazzite.
-
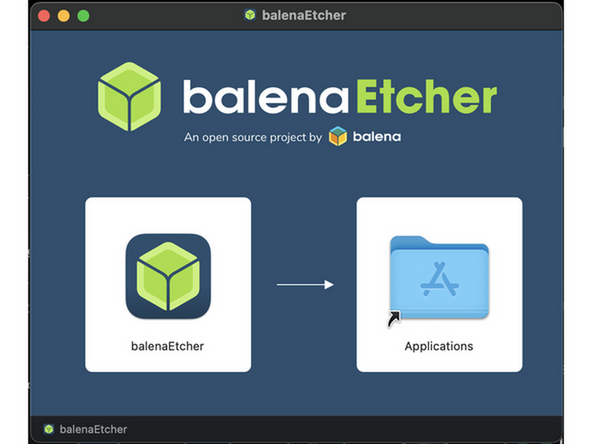
Download balenaEtcher as a tool to create the USB installer from the ISO. balenaEtcher is available for MacOS. Install it.
-
Launch balenaEtcher. Insert your USB drive (8GB or larger). Click on "Flash from file" and select the Bazzite iso that you downloaded. Click on "Select target" and choose your USB drive. Click "Flash" and wait a minute or two for it to complete.
-
Once the USB drive creation is complete, you can close balenaEtcher and eject the USB drive from your OS.
-
-
-
First, download the latest Bazzite release from the Bazzite website. We'll go through the steps in this Guide assuming a simple installation scenario of a fresh install on a blank drive.
-
At the top of Bazzite page upper right, click on the Download Bazzite button.
-
Next, select on Desktop or Laptop. The select Intel/AMD. Choose KDE (we recommend the KDE Plasma option). Lastly, select the Download Bazzite button under New Users. This will download your ISO for Bazzite.
-
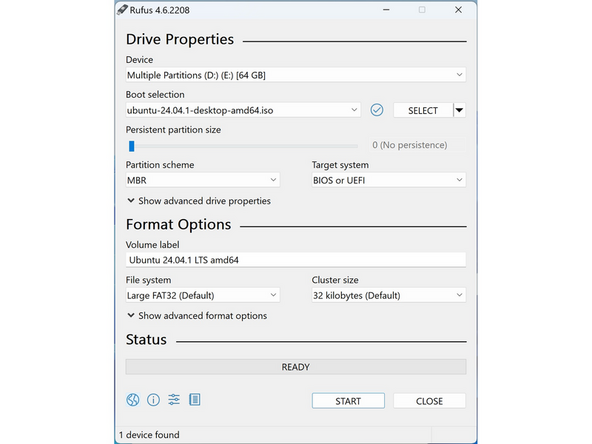
Download Rufus as a tool to create the USB installer from the ISO. The first item in this list will be a link to install installer for the latest version. Install Rufus using this. Open Rufus, from the Device drop-down, select the USB flash drive.
-
In order to use devices like external hard drives, external solid state drives, or the Framework Storage Expansion Card to create a live USB, List USB Hard Drives must be enabled under Show advanced drive properties.
-
Use the Select Button next to Boot selection to choose the downloaded Bazzite ISO.
-
Set Partition scheme to GPT to ensure the live USB is properly recognized at boot.
-
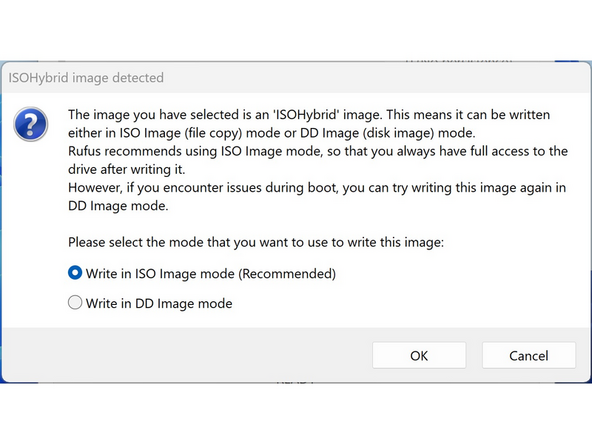
Click Start. A window will pop up to prompt for a choice between dd image mode and ISOHybrid image mode. Select ISOHybrid image mode then OK.
-
-
-
First, download the latest Bazzite release from the Bazzite website. We'll go through the steps in this Guide assuming a simple installation scenario of a fresh install on a blank drive.
-
At the top of Bazzite page upper right, click on the Download Bazzite button.
-
Next, select on Desktop or Laptop. The select Intel/AMD. Choose KDE (we recommend the KDE Plasma option). Lastly, select the Download Bazzite button under New Users. This will download your ISO for Bazzite.
-
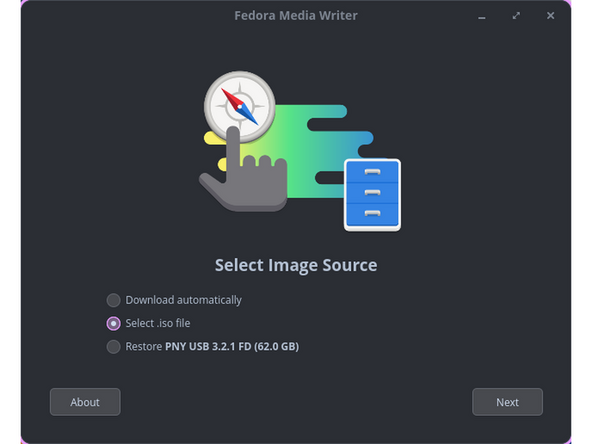
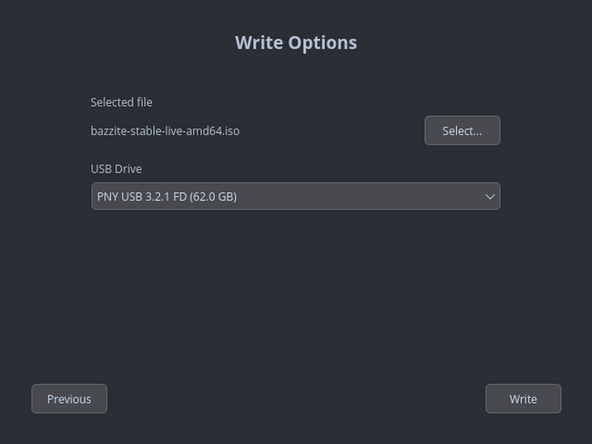
Install Fedora Media writer from the terminal.
flatpak install MediaWriterand then type Y when prompted. -
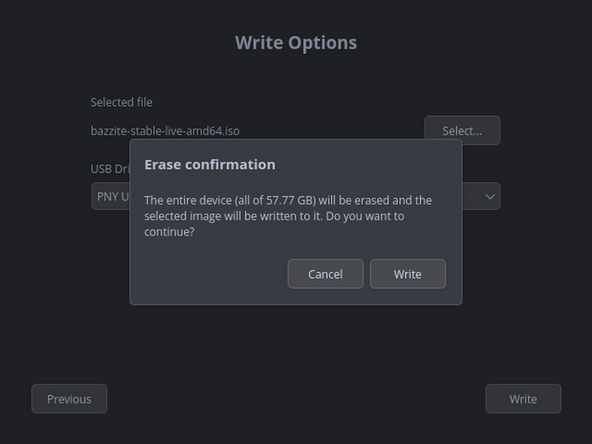
Insert an 8 GB+ USB key. Back up its contents first, since this erases the entire drive.
-
Open Fedora Media Writer, choose Select .iso file, and pick the Fedora 44 Workstation ISO you downloaded.
-
Select your USB drive from the device list, double-checking the name and size so you don't wipe the wrong disk.
-
Click Write, enter your password if prompted, wait for it to finish, then click Finish and safely eject the USB.
-
-
-
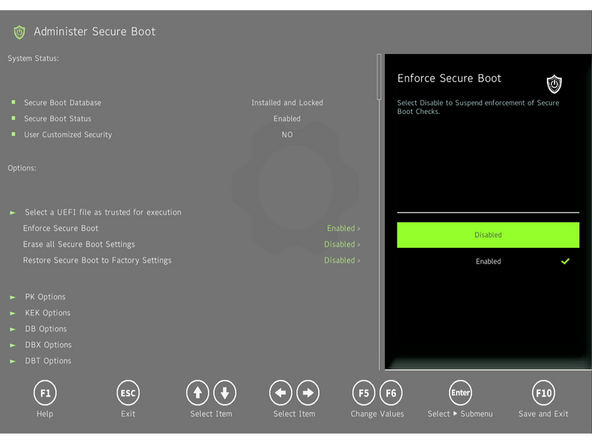
Bazzite works with Secure Boot. Bazzite Live USBs will boot regardless of whether or not it is disabled. Users who intend to dual-boot with Windows should not disable Secure Boot! Please follow Bazzite guidance for utilizing secure boot with Bazzite here.
-
If a user has a reason to disable Secure Boot, such as specialized third party devices that require unsigned drivers:
-
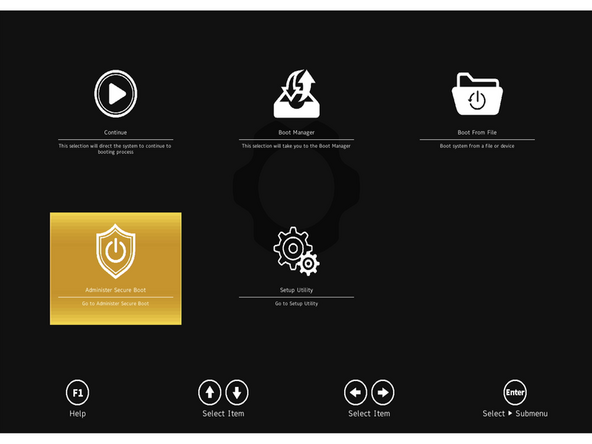
Boot into BIOS by tapping F2 just before the Framework splash screen.
-
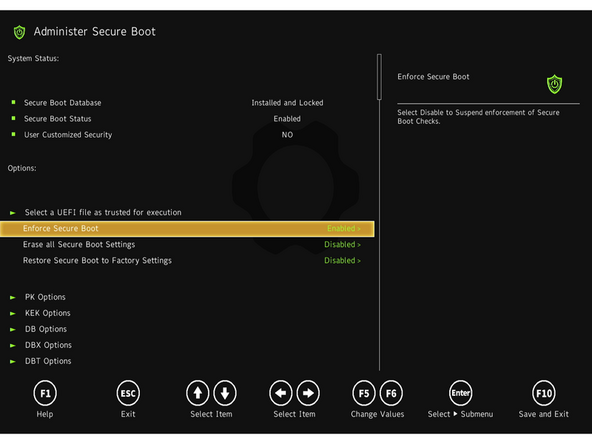
Arrow down to Administer Secure Boot. Press enter.
-
Arrow down to Enforce Secure Boot. Press enter, select Disabled, and press enter.
-
Press F10 to save and reboot. With Yes selected, press Enter.
-
To enable Secure Boot again later in the future, repeat the above steps but select Enable this time.
-
-
-
Insert the USB drive into the powered off Framework Laptop 13 Pro, and then power on.
-
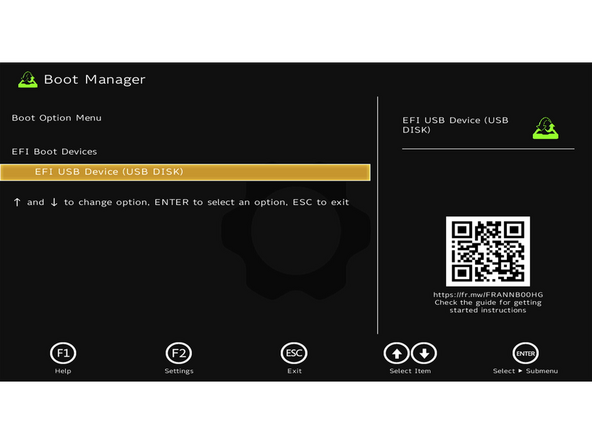
If there is already an OS installed on the internal storage, enter the Boot Manager by tapping F12 after pressing the power button to turn the laptop on. Tap the F12 key until the message "F12 is pressed. Go to Boot Manager." is displayed.
-
Select the USB drive, usually labeled "EFI USB Device (USB Disk)". Press the enter key.
-
If Windows is already installed on the system attempting to boot into a Linux Live USB may result in a "Device is Active" error. This will provide guidance to overcome this error.
-
-
-
An internet connection is optional for installation, but the WiFi icon in the system tray on the right of the taskbar at the bottom of the display can be used to connect to a network.
-
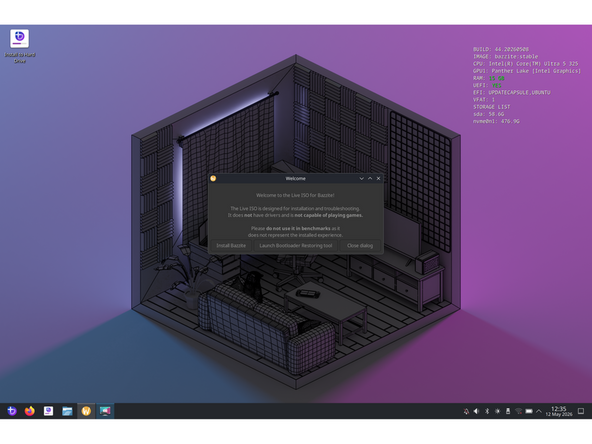
Bazzite will boot directly to a desktop and automatically open the "Welcome" window. Click on "Install Bazzite" to open Bazzite installation.
-
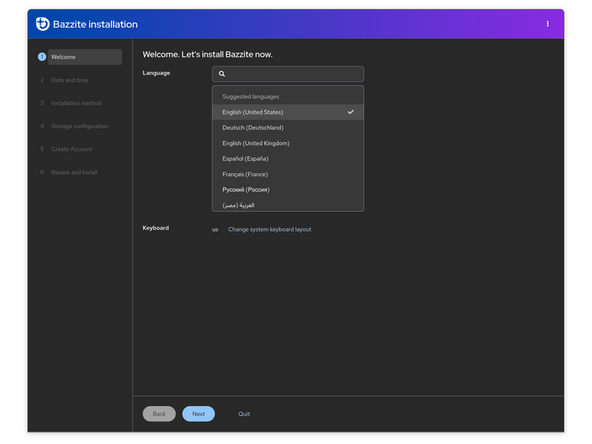
The "Welcome" window will close and "Bazzite installation". Start by selecting a language and a keyboard layout.
-
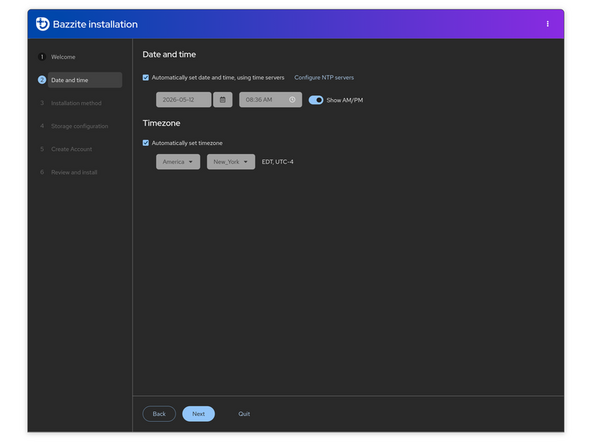
Configure the date, time, and timezone.
-
Configure NTP servers only works with an active internet connection.
-
-
-
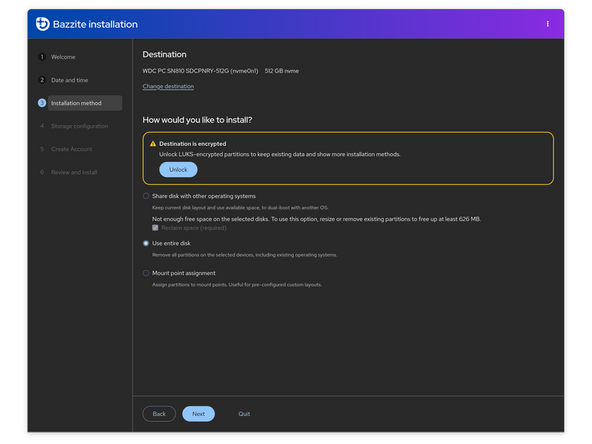
In the "Installation method" section, click "Change Destination" to pick a drive if the internal storage was not automatically selected.
-
Select "Use Entire Disk" to automatically use an optimal disk layout.
-
This will result in the loss of data if an OS is already installed to the drive. Ensure any important data is backed up.
-
Advanced users can manually configure dual-boot, but this is not recommended by Bazzite or Framework.
-
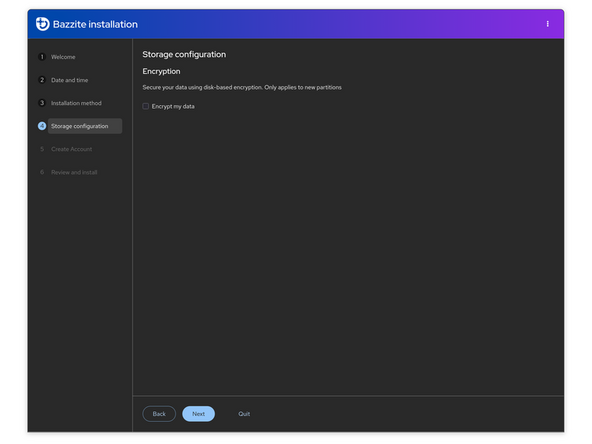
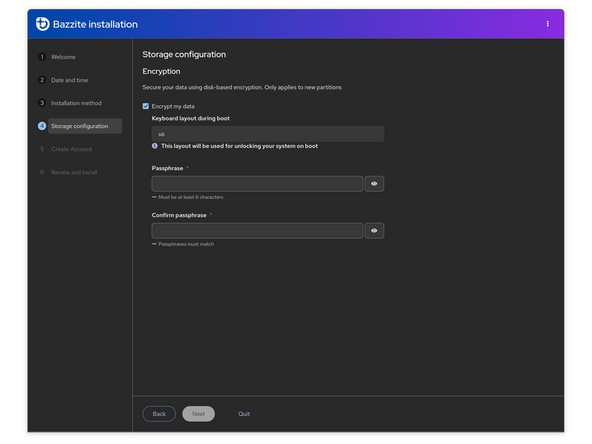
Choose whether or not to enable disk encryption. If disk encryption is enabled, options will be provided to set the password as well as the keyboard layout for password input.
-
Important for non-US keyboard users! Please open this link in a new tab and read carefully.
-
-
-
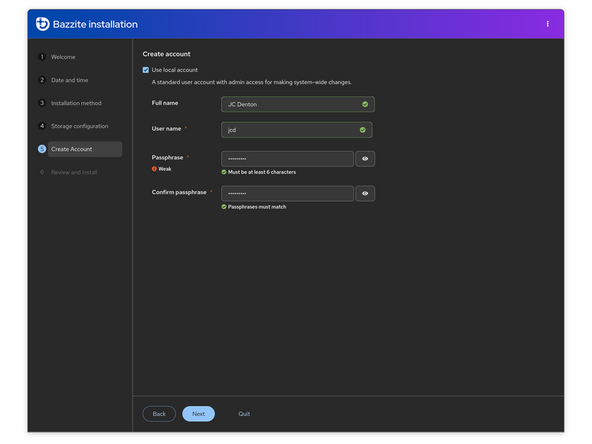
Leave the "Use local account" checked and set the name, username, and password for the first user account with admin privileges.
-
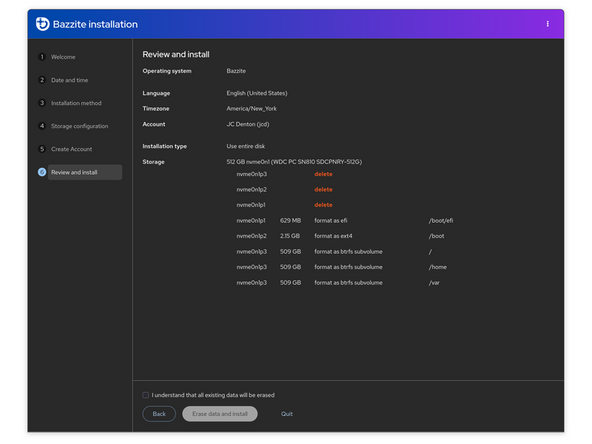
Review the information on the summary screen. This is the last chance to go back and make any changes to things like storage configuration.
-
Check "I understand that all existing data will be erased", and click "Erase Data and Install".
-
After installation completes, click "Exit to live desktop", then use the Application Launcher on the left of the taskbar at the bottom of the display to Restart.
-
-
-
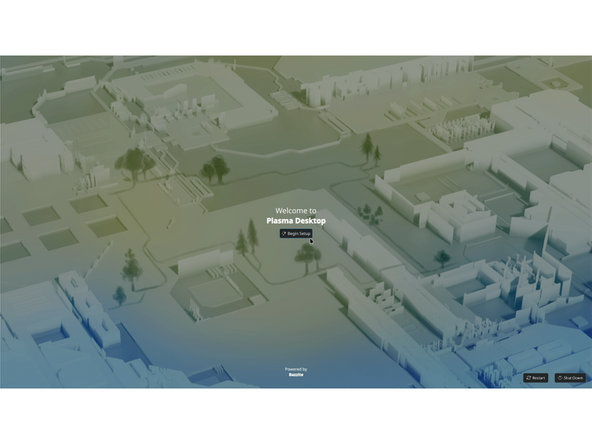
On first boot, Bazzite with KDE will boot to an onboarding for Plasma Desktop for the user to finish first time setup.
-
As during the install, set a Language then choose a keyboard layout. This is an opportunity to change either if a mistake was made during installation.
-
Choose whether or not to enable the Dark Mode theme. This is a matter of preference.
-
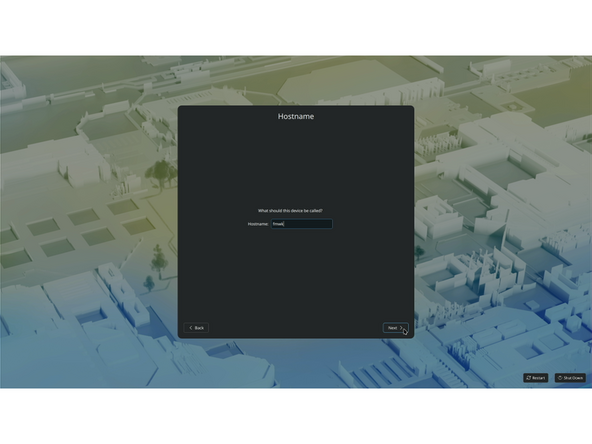
Set a Hostname for the system. This is the name by which the computer will identify itself on the network.
-
Set a time zone, this is an opportunity to correct any misinputs made earlier during the installation process.
-
Connect to a network. This step can be skipped in the event that there is no network to connect to.
-
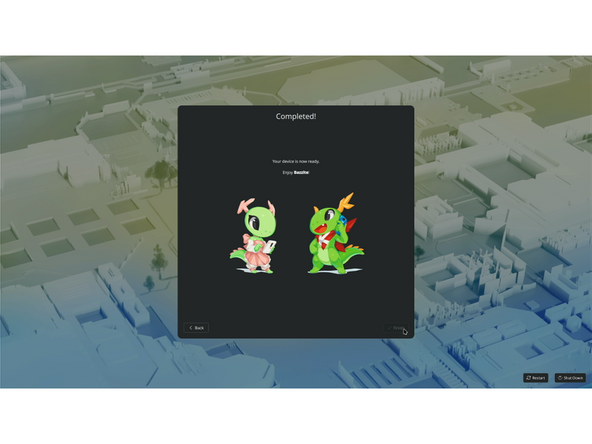
Bazzite running KDE is ready to use. Settings like touchpad sensitivity, keyboard shortcuts, display options, and more can all be managed from the System Settings app.
-
-
-
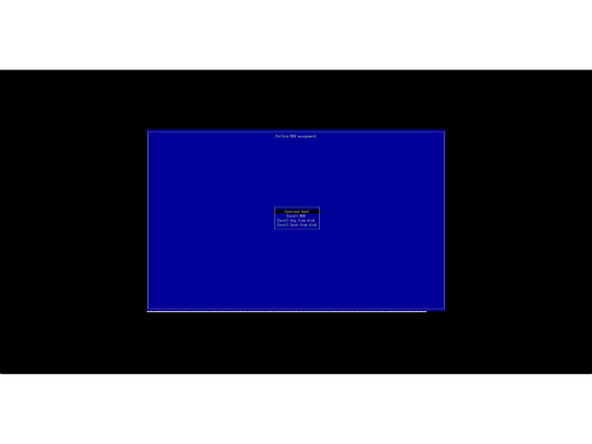
With secure boot enabled, you will be presented with this blue screen. Don't panic, this is not Windows. This is merely how we setup secure boot.
-
Arrow key down to Enroll MOK press enter. Then at the next screen you will see the option to continue by arrowing down, click enter on continue.
-
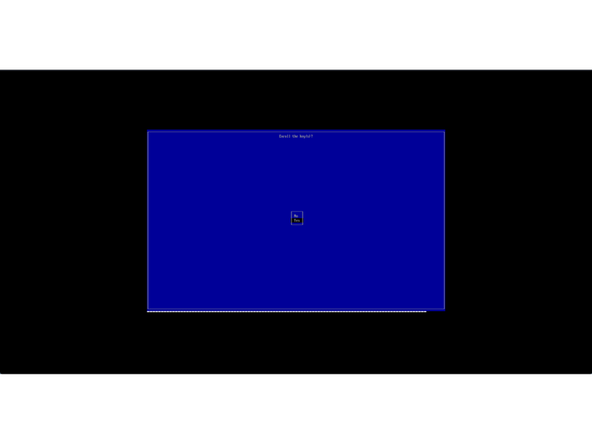
At the next screen, you will see Yes and No, choose Yes, then enter. After clicking enter on Yes, a password box appears. The password is
universalblueall lower case, one word. Key presses will not show up in the box, so type carefully, then press enter. -
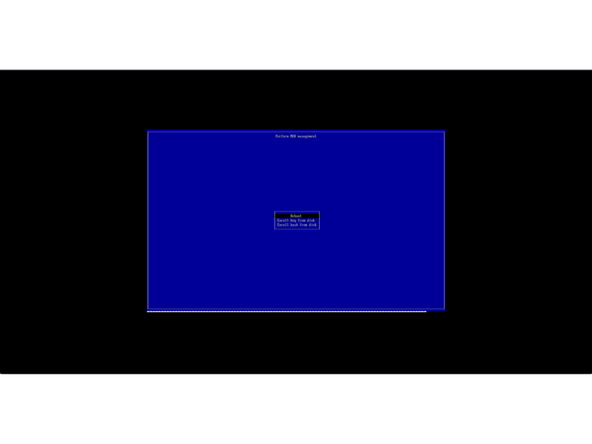
Finally, the last step is to click enter on Reboot. You are done, your secure boot enrollment is configured.
-
-
-
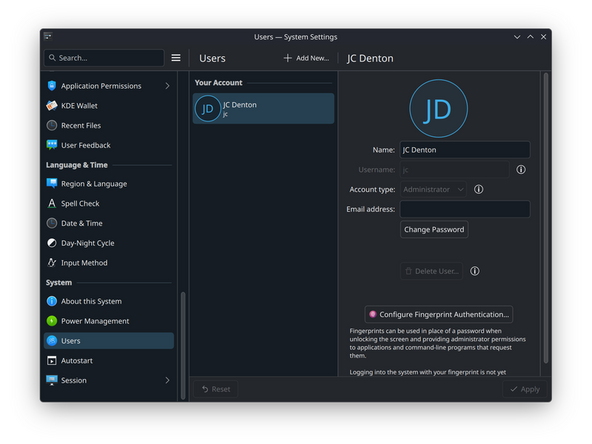
Open the Application Launcher at the bottom left of the display and open the System Settings app.
-
In the sidebar on the left of the System Settings app, scroll down and select Users.
-
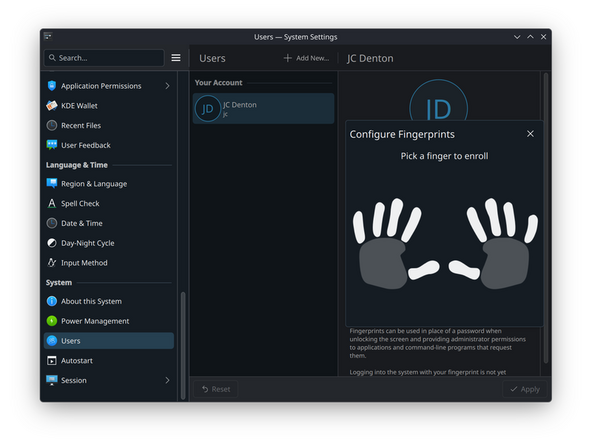
Click "Configure Fingerprint Authentication..." which will bring up a Configure Fingerprints window. The Add button in the lower right corner can be used to add fingerprints.
-
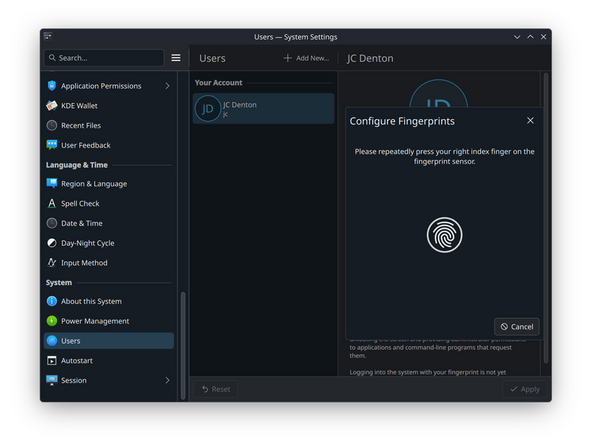
Click on the corresponding finger to scan the fingerprint for. Enter the user password when prompted, then follow the on-screen directions, repeatedly pressing and lifting the finger from the fingerprint sensor.
-
Click Done after the "Finger enrolled" screen appears. Repeat for up to 10 total fingerprints. The Enroll Fingerprint and System Settings windows can be closed once finished.
-
If you're experiencing issues getting your fingerprint reader working, please contact support.
-
This process is almost identical on Gnome, but the Users menu is found in the System section of the sidebar of the Gnome System Settings app.
-
-
-
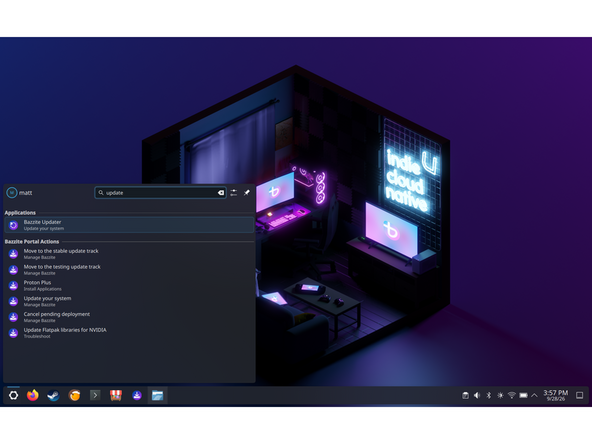
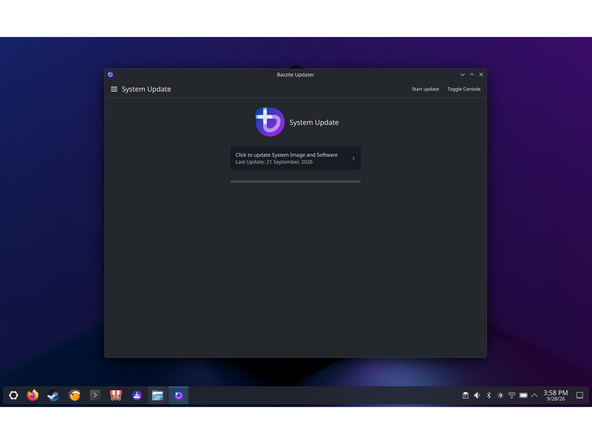
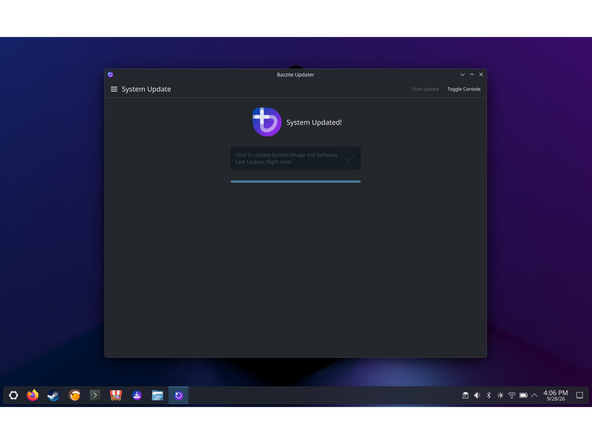
Bazzite automatically runs updates in the background on a daily basis, however they can be triggered manually by opening the Application Launcher and running the System Update app.
-
Whether updates are run automatically or manually, certain types of updates require the system to be rebooted before they take effect. These include the Linux kernel, system libraries, driver packages, and the desktop environment.
-
Running the System Update app will open a Konsole terminal window running the command
ujust update. No input is required until the command is finished running. -
If successful, the options are "R" to reboot, "Q" to close the window, or "S" to enter a shell to run more commands. Generally speaking it's recommended to reboot after running updates.
-
-
-
Bazzite is atomic and by its nature, is resilient. However, should something not work as expected due to a suspected regression - you can roll back your installation to a previous state. This is an automatic feature provided by Bazzite.
-
Roll back to the image of your OS before the most recent batch up updates. Just run bazzite-rollback-helper rollback in a terminal. Press enter, reboot when prompted.
-
You should not try pinning releases or moving to rebasing unless it is suggested by support or by someone from the Bazzite team.
-
You can learn more about how the rollback system works here.
-
-
-
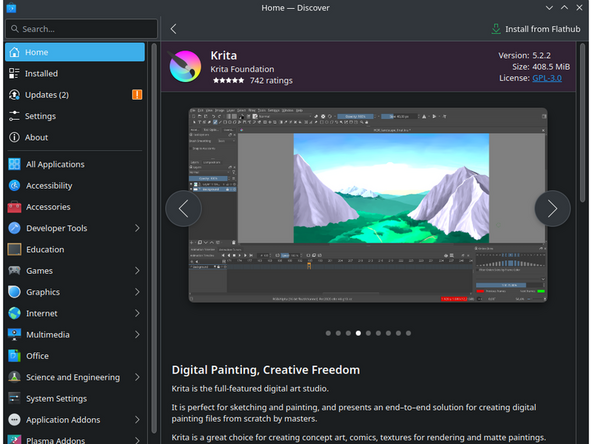
Flatpaks. Installing Flatpaks is the recommended method to installing software. This is the primary method of installing applications on Bazzite and is recommended to use Flatpak over other formats for most software when possible.
-
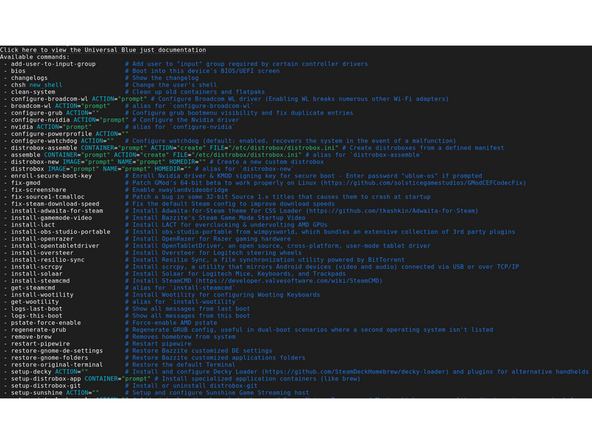
Ujust. Technically ujust is not a package format, but are convenience commands that automate tasks using scripts which can be utilized to install specific software.
-
Homebrew. This is a package manager that installs packages to their own prefix, and is used strictly for command-line interface (CLI) and terminal user interface (TUI) applications. Do not install graphical applications or anything that may override system-level packages with Homebrew.
-
Quadlet. Unlike the above options, this is a features of podman that allows a user to run a container as systemd units. It works by using a declarative syntax like docker compose but integrates to systemd and use podman as a backend.
-
Distrobox. Run other minimal variants of popular Linux distributions in Bazzite inside of a container, and access each distribution's packages without any of their dependencies and libraries affecting the host machine.
-
AppImage. A a universal package format that attempts to bundle every dependency that an application needs into one portable file. Applications installed as an AppImage can integrate with your desktop and be managed with Gear Lever which is pre-installed on Bazzite.
-
Manage OS Rollbacks and Install RPMs. Bazzite uses bootc for core system image management and rpm-ostree for layered package and kernel argument modifications, maintaining a balance between an Atomic base and user customization.
-
-
-
Steam. In Bazzite, Steam is installed and configured out of the box. It can run Windows games on Linux. It utilizes a wide range of projects and patches all packed into a piece of software built-in to Steam called Proton for Windows compatibility.
-
Important: Framework Laptop 12 is not designed as a gaming laptop. But it can run lower demand games. Typically 2D or low fidelity 3D games will work well enough.
-
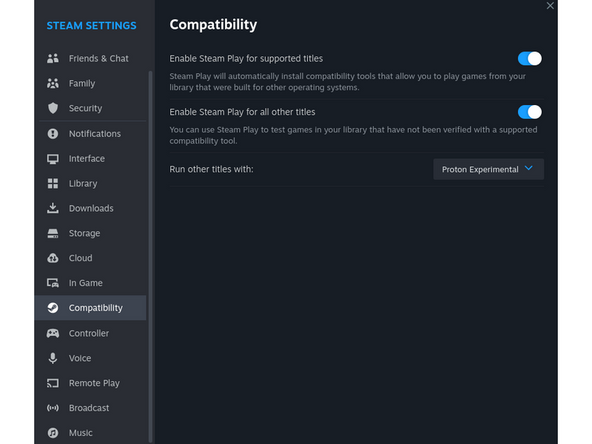
Currently Steam only allows whitelisted games to run by default on the desktop Steam client. You can change this by enabling this in Settings > Compatibility > Enable Steam Play for all other titles.
-
Common Gaming Issues. This provides a guide for some common issues and explains what your options are.
-
Auto-Mounting Game Drives. Read the Auto-Mounting Secondary Drives Guide for more information. It is also recommended to do your own research on drive mounting on Linux.
-
Lutris. A game management software that doubles as a WINE front-end for Windows games. Several games and launchers can be installed by searching for the title and using one of the installer scripts for it.
-
Same applies with Lutris on the Framework Laptop 12, it's not designed for gaming. But capable of running some platformer style games.
-
-
-
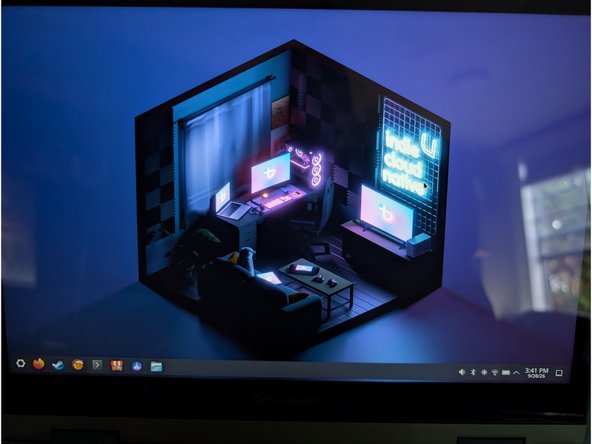
So what additional installation tweaking needs to be done? That is it, you're done. Curious what else Bazzite can do? Take a look at their user guide here.
-
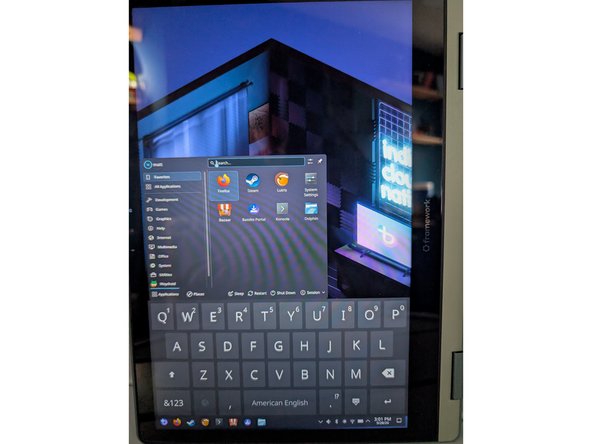
Using Tablet Mode. Simply fold back the screen into tablet mode. It's that easy. On screen keyboard appears when you enter any text fields like application search, text editing, etc.
-
-
-
Making sure you are on the latest firmware. Framework firmware updates can be manually checked for by running the commands
fwupdmgr refresh --forceandfwupdmgr get-updates. They can then be installed withfwupdmgr update. -
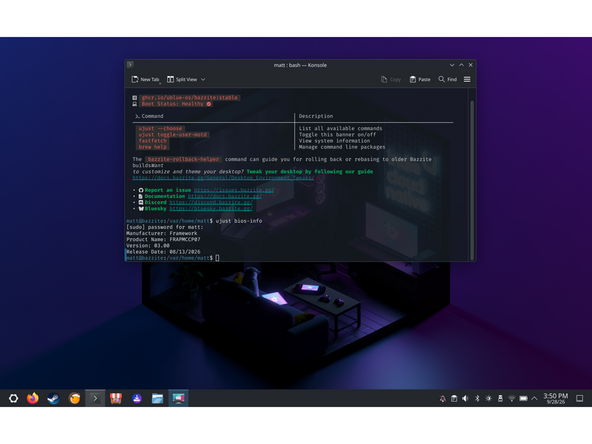
Want to check the BIOS version? Go to and click upper left corner where you see the Framework gear launcher, click Terminal. Type in ujust bios-info, click the enter key.
-
The output will tell you which Framework Laptop 12 you have and also which BIOS version you're using.
-
-
-
As a general rule, your Bazzite installation experience should be nearly flawless. That said, there are exceptions.
-
-
-
-
When reaching out to Support, indicate you are running Bazzite and then create the following text files below, include them in your reply to support's first email to you:
-
ujust logs-last-boot > last-boot.txt
-
ujust logs-this-boot > this-boot.txt
-
sudo bootc status > bootc.txt
-
-
-
Added Sept 2025 - KDE Plasma users: We have seen a flickering issue for anyone using KDE Plasma by some customers. While it is still being investigated, it appears to be alleviated by: opening System Settings > Display > Adaptive Sync and set it to Never — flickering stops.
-

Enjoy using Bazzite on your Framework Laptop 12!
Enjoy using Bazzite on your Framework Laptop 12!
Cancel: I did not complete this guide.
2 other people completed this guide.


One Comment
Issues with the guide:
-Rufus Image wrong
-Bazzite Image will be File System NTFS
-Selecting "Image in ISO mode" did not create bootable media (dumped to Grub CLI), had to use DD mode.
Also link from here:https://frame.work/ca/en/laptop12?tab=re...
Goes to wrong website Bazzite Installation on the Framework Laptop 16
david a mattatall - Open Reply