
Introduction
Once you have your Framework Laptop 16 set up following the Quick Start Guide, you’re ready to install your preferred OS. With the latest release of Arch Linux, everything works pretty smoothly. You can check our Linux page for additional Linux compatibility notes.
NOTE: This is a Compatible Community Supported Linux Distribution. Learn more here.
Tools
No tools specified.
Parts
-
-
First, download Arch Linux from Arch's website. Arch Linux has a detailed installation guide that you can follow. We'll go through the steps in this Guide assuming you have a simple installation scenario of a fresh install on a blank drive.
-
Download balenaEtcher as a tool to create the USB installer from the ISO.
-
balenaEtcher is available for macOS on Intel and Apple Silicon Macs. Download the X64 version for Intel Macs and the arm64 version for Apple Silicon Macs.
-
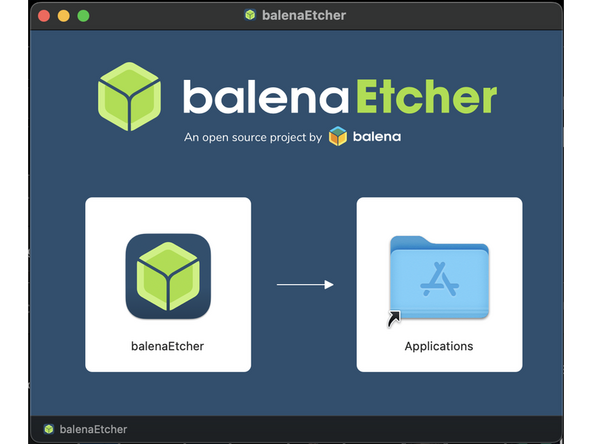
Install by double clicking on the balenaEtcher.dmg file, then click-and-dragging the balenaEtcher icon to the Applications folder.
-
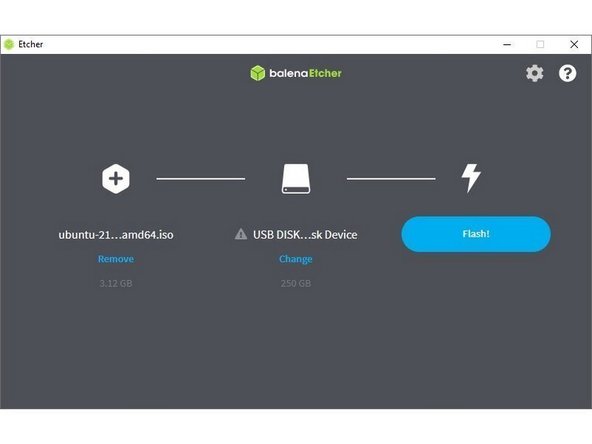
Insert a USB drive that is 8GB or larger, allow your Mac to access the accessory, then launch balenaEtcher.
-
Click on "Flash from file" and select the Arch Linux ISO downloaded earlier. Then click on "Select Target" and choose the USB drive. Finally click "Flash" and wait for the process to complete.
-
Once the USB drive creation is complete, it is safe to close balenaEtcher and eject the USB drive in Finder.
-
-
-
First, download Arch Linux from Arch's website. Arch Linux has a detailed installation guide that you can follow. We'll go through the steps in this Guide assuming you have a simple installation scenario of a fresh install on a blank drive.
-
Download Rufus as a tool to create the USB installer from the ISO - select the top download option from the link provided. Rufus is available for Windows. Install it.
-
Open Rufus, from the Device drop-down, select the USB flash drive stick.
-
In order to use devices like external hard drives, external solid state drives, or the Framework Storage Expansion Card to create a live USB, List USB Hard Drives must be enabled under Show advanced drive properties.
-
Use the Select Button next to Boot selection to choose the downloaded Arch Linux ISO.
-
Set Partition scheme to GPT to ensure the live USB is properly recognized at boot.
-
Click Start. A window will pop up to prompt for a choice between dd image mode and ISOHybrid image mode. Select ISOHybrid image mode then OK.
-
-
-
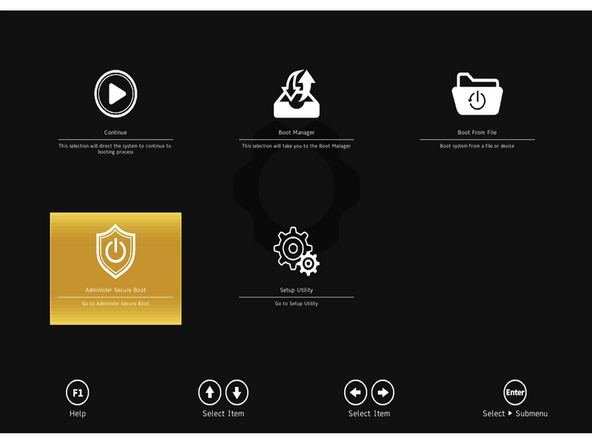
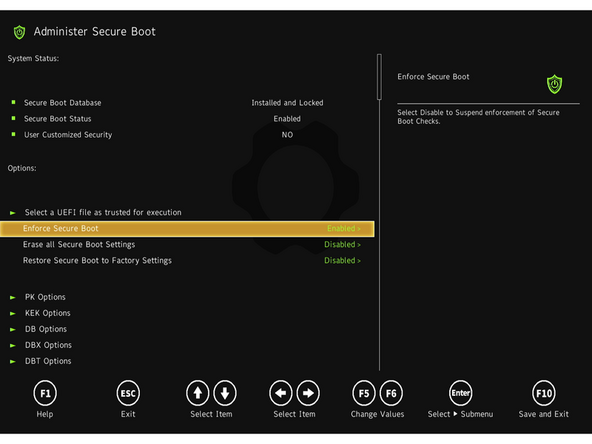
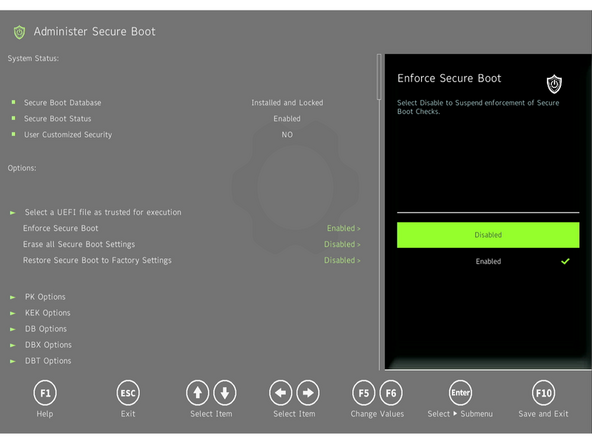
Enforce Secure Boot must be Disabled! While Arch Linux can be configured to support Secure Boot, the Live ISO does not ship with a signed bootloader by default. Information about Secure Boot on Framework Computers can be found here.
-
To disable Secure Boot, repeatedly tap F2 after turning on the computer to enter the BIOS Menu. Then use the arrow keys to select "Administer Secure Boot" then use the arrow keys to change "Enforce Secure Boot" to "Disabled". Press F10 to save the changes and reboot.
-
Information about implementing Secure Boot with Arch Linux can be found on the Arch Wiki.
-
-
-
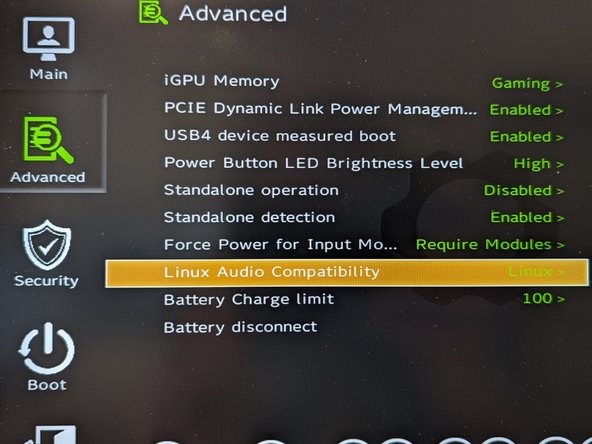
Before we begin the installation process with the Live USB, please ensure that the Linux Audio Compatibility in BIOS is set to Linux. Explanation as to what this does can be found here.
-
Power on the laptop, repeatedly tapping F2 in order to get into the BIOS. Note: If you're having trouble with this, try again, holding down the Fn key while rapidly tapping F2.
-
In BIOS mode, arrow key over to Setup Utility. Press the enter key. Arrow down to Advanced. Then arrow right, then arrow down to Linux Audio Compatibility. Press enter.
-
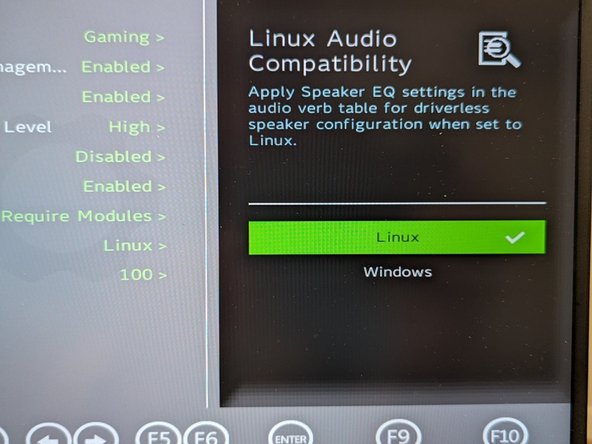
A new box for Linux Audio Compatibility will appear, arrow to Linux, then press enter. Now press F10 key to reboot.
-
Now we don't have an OS installed yet. So the reboot won't get us to a running operating system and we fully expect to see an error to this point. Simply press the power button to shutdown.
-
The next step is to install Arch Linux.
-
-
-
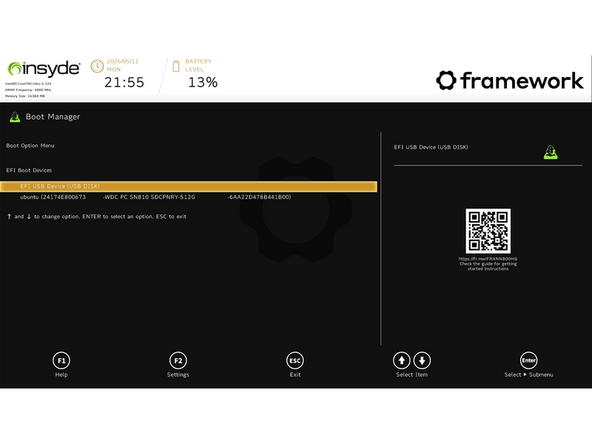
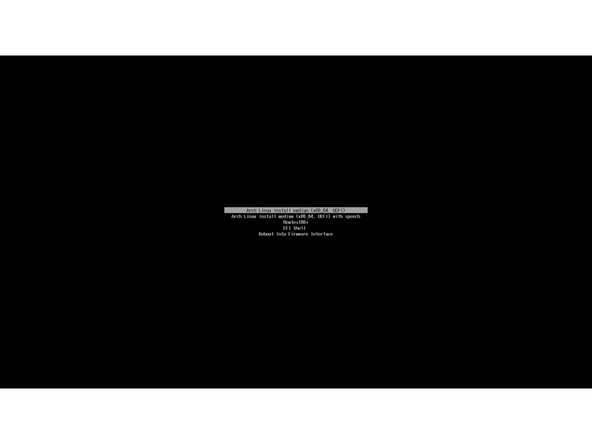
Insert the USB drive into the powered off computer, and then power on. If an existing OS is installed on the Storage drive in your laptop, immediately after the power light turns on, repeatedly tap the F12 key.
-
If there is no internal storage drive installed or it is blank, the laptop will boot to the USB drive directly.
-
Hit Enter again to boot into and install Arch Linux.
-
This is a distribution of Linux that ships in an extremely minimal state. Please utilize the Arch Wiki to for more detailed information on how to install it.
-
This guide follows a fast track method for installation using archinstall designed to make the process more user friendly.
-
-
-
Once booted into a live environment, a command line is presented automatically logged in with the root account to provide full admin access.
-
Having root access means that anything targeting the internal drive or other drives connected to the computer can result of loss of data. If possible, back up any important data before continuing with this install process.
-
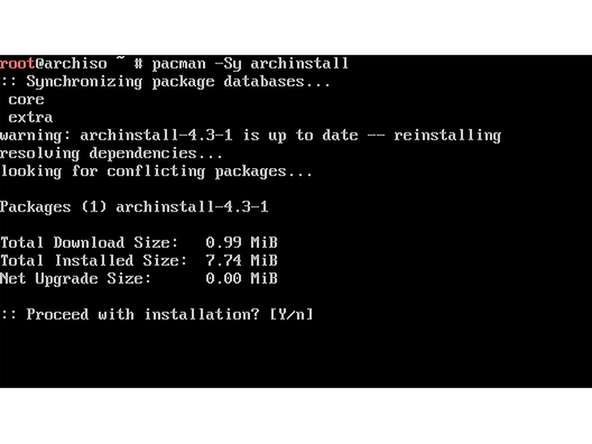
Start by connecting to a network. Wired networks over the Ethernet expansion card will automatically configure. For wireless networks use the command
iwctl station wlan0 connect SSIDreplacingSSIDwith the name of the desired wireless network. -
Once connected to the internet, install the latest version of the
archinstallscript by runningpacman -Sy archinstallthen enteringYwhen prompted. -
When this finishes, start the
archinstallscript. The true Arch Linux installer starts here. -
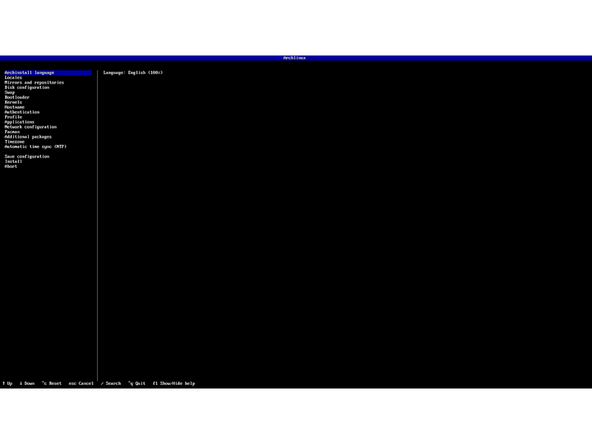
The starting point for
archinstallis a list of stages, with the first stage being to select a language for the installer. The installer is primarily navigated using the arrow keys, enter key, and space bar.
-
-
-
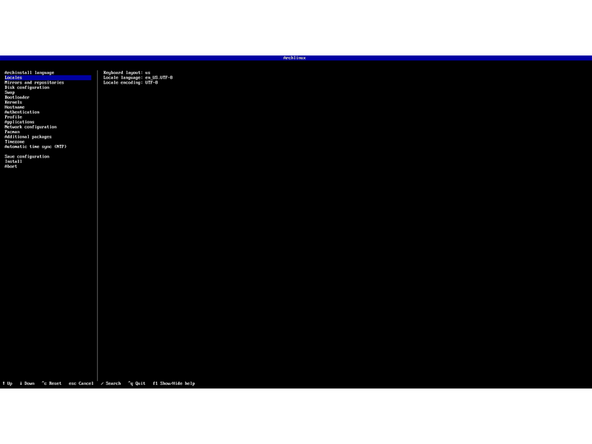
After choosing a language for the installer, use the arrow keys and enter key to select Locales. If the default options shown are acceptable, this can be skipped.
-
Now use the keyboard to select the Mirrors and Repositories menu.
-
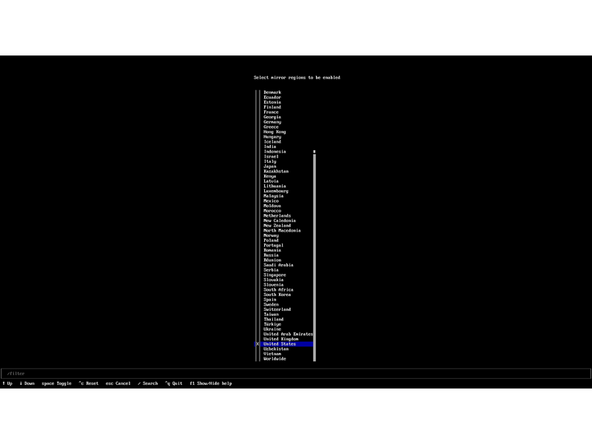
Choose "Select regions" and use the arrow keys to select the nearest geographic region to get the best performance for system updates.
-
Choose "Optional repositories" if the
multilibrepository is needed to provide libraries for packages such as Steam.
-
-
-
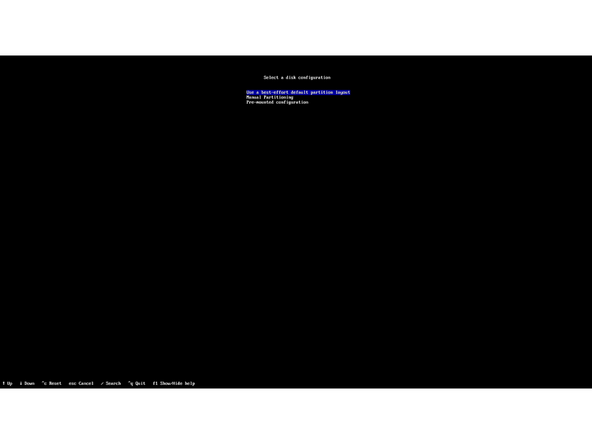
Select "Disk configuration" to bring up a screen showing just options for "Partitioning" and "Back". Choose "Partitioning".
-
Select "Use a best-effort partitioning layout" to enter the disk selection menu.
-
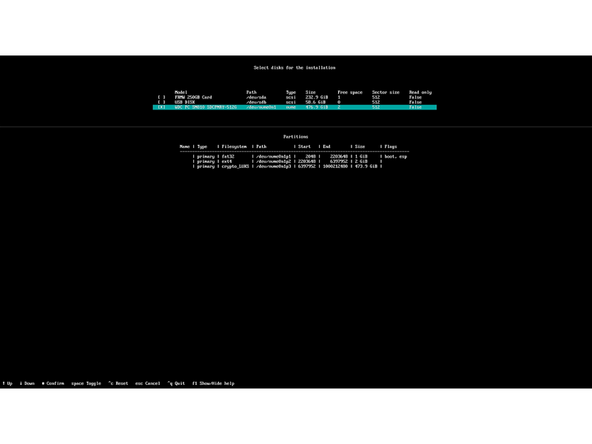
Select a disk for install by using the space bar to mark that disk with an
Xwhile its line is highlighted. Typically the disk should be the one with the path/dev/nvme0n1. -
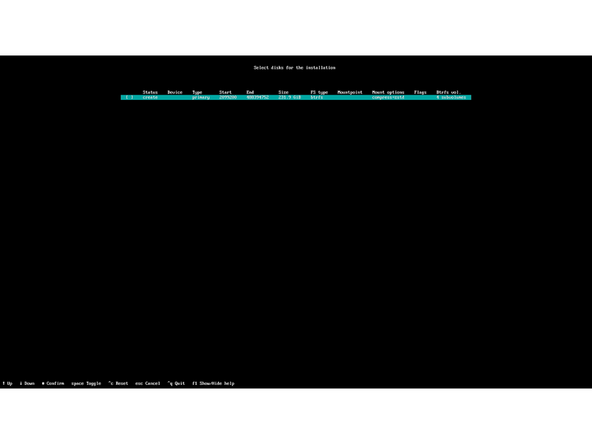
On the "Select main filesystem" screen, select the preferred filesystem. Users who do not know the differences between filesystems are probably safest choosing
ext4orxfsas these are generally considered time-tested. -
btrfsincludes additional prompts for choosing whether to use features like subvolumes, compression, and snapshots. More information about these features can be found on the Arch Wiki. -
Encryption can be enabled by entering the Disk encryption submenu, choosing LUKS, then using the space bar to select the main partition made earlier for encryption.
-
Back out of "Disk configuration" when finished and enter the "Swap" menu. Here select Yes to enable zram, which uses compressed sections of system memory in place of a swap file or partition. Then select the default option of
zstdfor compression.
-
-
-
Select the "Bootloader" menu, then again the "Bootloader" submenu. For maximum compatibility and ease of maintenance later, select GRUB or Limine as a bootloader.
-
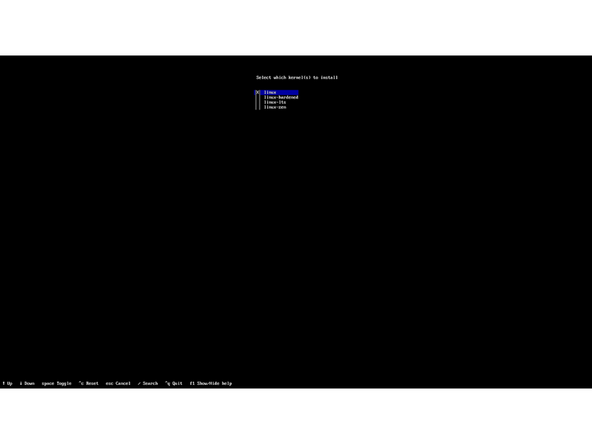
Back out of the "Bootloader" menu and move on to the "Kernels" menu. For simplicity's sake select Linux here.
-
Back out of the "Kernels" menu and enter the Hostname menu. This is where the name the computer uses to identify itself on the network is set. It is usually safest to limit this to alphanumeric characters.
-
After setting hostname, enter the "Authentication" menu to create the first user.
-
Root password can be skipped, which disables the administrator account. The first user created will be given administrator privileges.
-
Select "User account", then enter a username and password. After confirming the password, choose yes when asked if the new user should be a superuser. Then select "Confirm and exit".
-
-
-
Back out of "Authentication" and enter the "Profile" menu then the "Type" submenu. Select the "Desktop" profile. This will open a selection for desktops. Choose according to preference.
-
KDE, Gnome, and Cosmic will most likely be the most comfortable choices for users new to Linux.
-
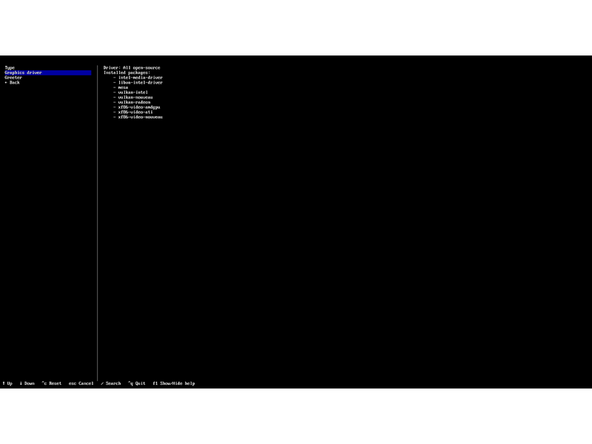
Enter the "Graphics driver" submenu. The default of "All open-source" is safe and makes it easier to transfer the drive between computers.
-
Select a greeter if one was not already selected by the desktop selection. This is a matter of user preference.
-
Back out of "Profile" and enter the "Applications" to set up some essential apps and services including Bluetooth and Additional Fonts.
-
The recommended option for Audio is
pipewire, and the recommended option for Power Management istuned. It is also helpful to install all of the additional fonts. -
Back out of "Applications" and enter the "Network configuration" menu. Select "Use Network Manager (default backend)" for the simplest configuration.
-
-
-
Back out of "Network Configuration". The "Pacman" section can be skipped as it only has a toggle for colorizing terminal text on compatible terminals and displays.
-
The "Additional Packages" section allows the user to install any additional packages that are not included in the selections made up to this point. It is optional and any packages that can be added in this section can also be added post-install.
-
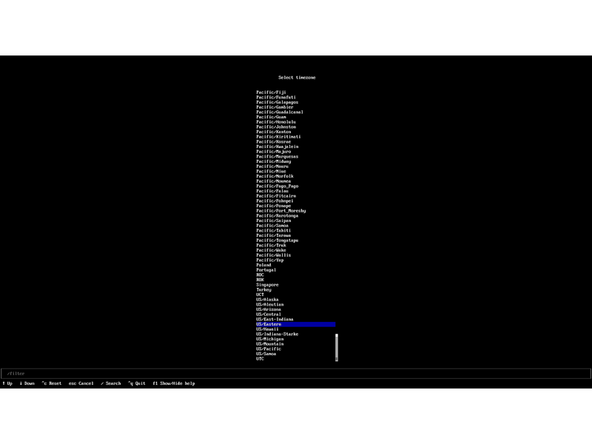
Enter the "Timezone" to select the timezone for displayed time on the system. "Automatic time sync (NTP)" can be skipped as it is already enabled by default.
-
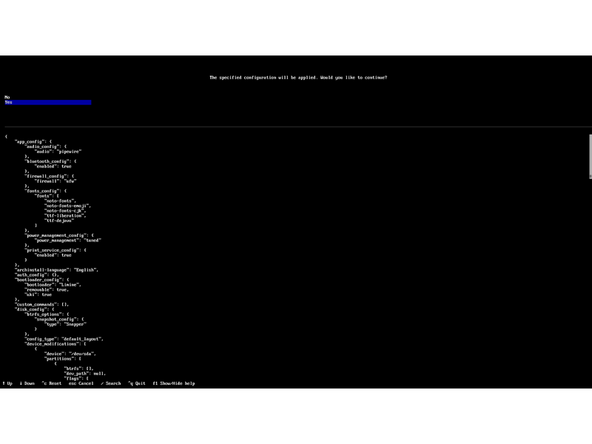
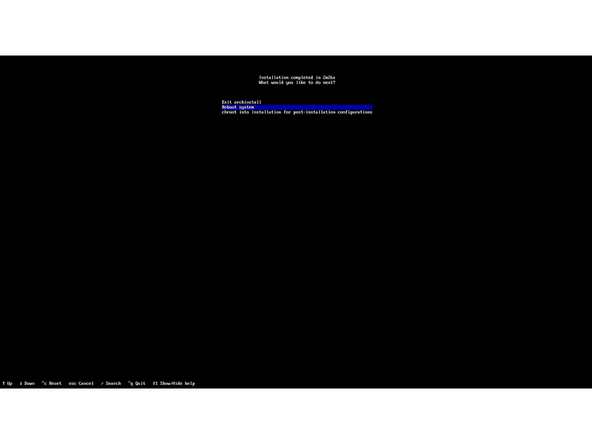
Select "Install" then confirm by selecting "Yes". Installation time will depend heavily on the internet speed.
-
Select "Reboot system" when the install is completed.
-
-
-
Arch Linux allows for many different choices of desktop environment or window manager, so this guide will focus on the command line method for enrolling fingerprints.
-
Install the package
fprintdfor managing fingerprints if it is not already installed. This can be done by opening a terminal and runningsudo pacman -S fprintd. -
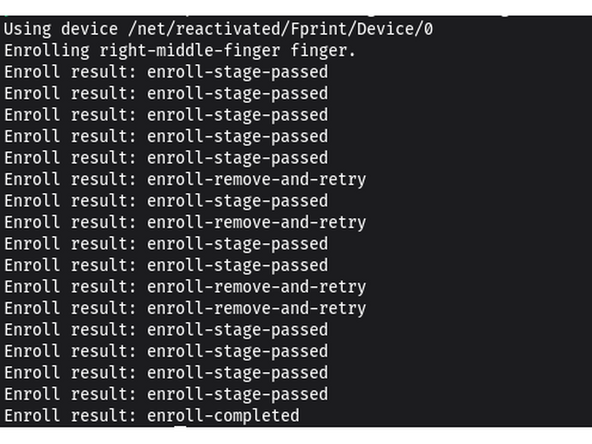
With
fprintdinstalled, fingerprints can be enrolled by running the commandfprintd-enrollwhich defaults to enrolling the right index finger. -
Other fingers can be chosen by adding
-fafter thefprintd-enrollcommand. Fingers are named in all lower case with dashes used in place of spaces. For examplefprintd-enroll -f right-middle-finger. -
After running this command tap and lift the finger repeatedly until enrollment is complete.
-
Further information on the
fprintcan be found on the Arch Wiki. -
If you're experiencing issues getting your fingerprint reader working, please follow our help guide to get your reader working for you on Fedora.
-
-
-
The Arch Wiki configuration knowledge base from the Arch Community.
-
-
-
Before updating to the latest firmware, make sure you verify which BIOS were running.
-
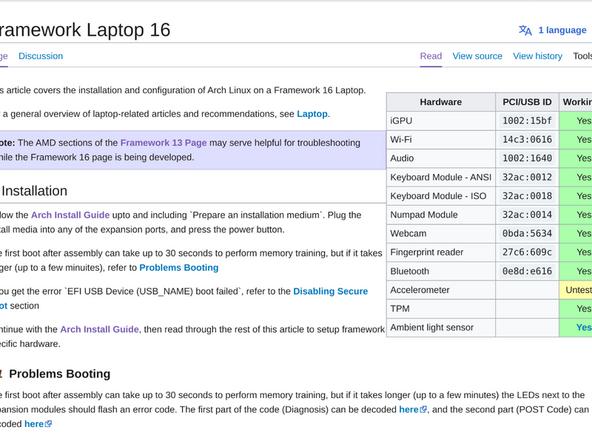
For Framework Laptop 16 AMD Ryzen 7040 Series, you can check here for the latest firmware.
-
-
-
The Linux kernel comes with an open source driver called
nouveauthat offers some basic functionality, but to get full performance from an Nvidia dGPU the proprietary drivers will need to be installed. -
To install the appropriate driver for the Framework Laptop 16's Nvidia dGPU option, run the command:
sudo pacman -S nvidia-open -
Reboot after installation is complete to allow the system to load the newly installed driver.
-
With the current package revisions, the
nvidia-openpackage should also install thenvidia-utilspackage which provides configurations for blacklistingnouveauand loading the necessary kernel modules for the proprietary Nvidia driver. -
If there are startup issues, like the display manager loading before the
nvidiamodule, thenvidia,nvidia_modeset,nvidia_uvmandnvidia_drmmodules can be added to theinitramfs. -
mkinitcpiousers may need to regenerate theirinitramfswith each Nvidia driver update. -
If there are issues with the display when resuming from sleep, it may be a issue with remapping the video memory.
-
One possible remedy for this is to enable the kernel module setting to save the full memory map to the
/tmpdirectory by running the command:sudo echo "option nvidia NVreg_PreserveVideoMemory=1" > /etc/modprobe.d/nvidia-suspend-remedy.conf
-
-
-
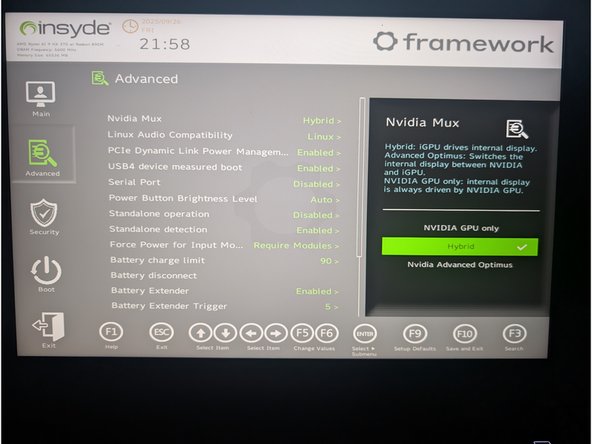
The Framework Laptop 16 with the NVIDIA dGPU module can operate in two primary graphics modes you will want to explore. These modes can be changed in the BIOS.
-
To access these settings: Tap F2 when powering on the laptop and the Framework Splash screen with the Framework logo is visible. Arrow over to Setup utility. Click enter. Down arrow to Advanced on the left side. Right arrow to NVIDIA Mux. Enter key. Make a selection, press enter. Press F10 and press enter again to save changes and reboot.
-
The third option, Advanced Optimus, behaves like NVIDIA Hybrid Mode on Linux. Therefore it is not relevant to this guide.
-
NVIDIA Hybrid Mode (Traditional Optimus): This is the default and most battery-efficient mode.
-
Display Path: The integrated AMD GPU (iGPU) is always connected to the display. When the NVIDIA GPU (dGPU) is used for a demanding task, it renders the frames and copies them to the iGPU to be shown on the screen.
-
Switching: Applications run on the power-saving iGPU by default. Steam uses dGPU this automatically for games.
-
Performance: Small but measurable latency and FPS penalty compared to direct dGPU output because every frame must traverse the iGPU.
-
Power Behavior: The iGPU remains on at all times. The dGPU powers up only when needed and typically idles around 4–6 W (P8 power state). This is the most battery-efficient configuration.
-
-
-
The Framework Laptop 16 with the NVIDIA dGPU module can operate in two primary graphics modes that offer different benefits. These modes can be changed in the BIOS.
-
To access these settings: Tap F2 when powering on the laptop and the Framework Splash screen with the Framework logo is visible. Arrow over to Setup utility. Click enter. Down arrow to Advanced on the left side. Right arrow to NVIDIA Mux. Enter key. Make a selection, press enter. Press F10 and press enter again to save changes and reboot.
-
The third option, Advanced Optimus, behaves like NVIDIA Hybrid Mode on Linux. Therefore it is not relevant to this guide.
-
NVIDIA GPU-Only (Discrete Mode)
-
Display Path: The dGPU drives the panel 100% of the time. The iGPU is fully disabled.
-
Switching: No switching possible without reboot — you must go back into BIOS or flip the MUX manually to return to Hybrid mode.
-
Performance: Maximum performance and lowest latency, because there is no iGPU in the pipeline.
-
Power Behavior Highest power draw. The dGPU cannot power down and battery life is significantly shorter, even at idle.
-
-
-
If you need additional help, feel free to visit our active support community.
-


Enjoy using Arch on your Framework Laptop 16! If you have any questions or run into any issues, we recommend bringing them to the Community in the Linux Arch topic. Members of the Framework team participate in discussions there.
Enjoy using Arch on your Framework Laptop 16! If you have any questions or run into any issues, we recommend bringing them to the Community in the Linux Arch topic. Members of the Framework team participate in discussions there.
Cancel: I did not complete this guide.
2 other people completed this guide.

One Comment
As a recommendation: You can use EndeavourOS if you want a vanilla arch install, but want a graphical installer akin to Debian and Fedora. The EndeavourOS repositories barely add anything, only some customization options, wallpapers, etc. It will effectively be a vanilla arch, with a standard arch linux kernel unlike CachyOS.
Otherwise, I'd recommend creating your own guide with compiled information from the Arch Wiki, as I, myself, don't care much for the arch install script. As an example, here's my XFCE Guide: https://pastebin.com/Bg0AVCWn