
Introduction
Once you have your Framework Laptop 13 Pro set up following the Quick Start Guide, you’re ready to install your preferred OS. CachyOS is one of the many community supported Linux distributions we recommend. It offers bleeding edge software enabling full hardware support with very little setup required, and the installer offers options for many popular GUIs.
Tools
No tools specified.
Parts
-
-
This process will delete all data from the flash drive being used! Ensure any important data that may be kept on those drives is backed up before continuing.
-
First, download the latest CachyOS release from the CachyOS website. We'll go through the steps in this Guide assuming you have a simple installation scenario of a fresh install on a blank drive.
-
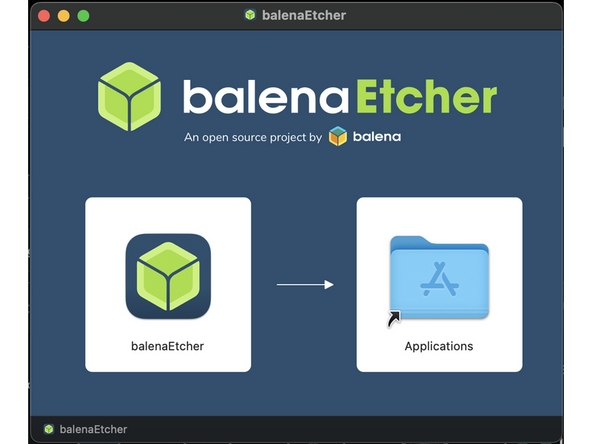
Download balenaEtcher as a tool to create the USB installer from the ISO. Download the X64 version for older Intel-based Macs. Download the ARM64 version for Apple Silicon based (M series) Macs.
-
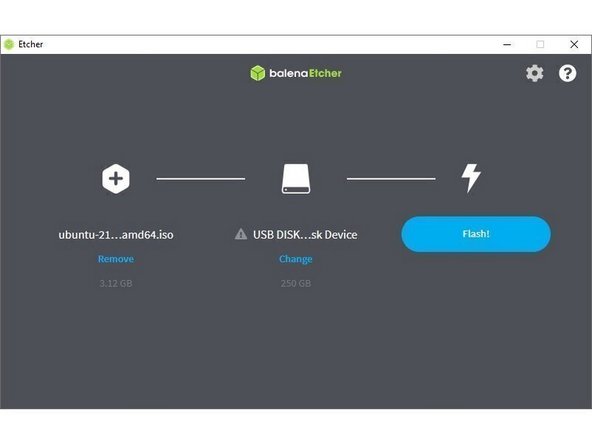
Launch balenaEtcher. Insert a USB drive (8GB or larger). Click on Flash from file and select the CachyOS iso that was downloaded. Click on Select target and choose the USB drive. Click Flash and wait a minute or two for it to complete.
-
Once the USB drive creation is complete, close balenaEtcher and eject the USB drive in Finder if it is still mounted.
-
-
-
This process will delete all data from the flash drive being used! Ensure any important data that may be kept on those drives is backed up before continuing.
-
First, download the latest CachyOS release from the CachyOS website.
-
Download Rufus as a tool to create the USB installer from the ISO. The first item in this list will be a link to install installer for the latest version. Install Rufus using this.
-
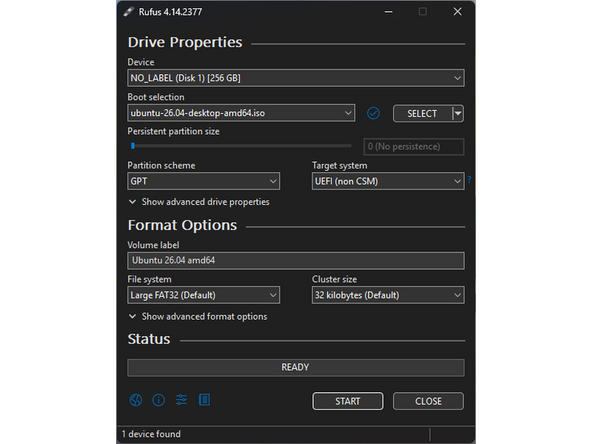
Open Rufus, from the Device drop-down, select the USB flash drive stick.
-
In order to use devices like external hard drives, external solid state drives, or the Framework Storage Expansion Card to create a live USB, List USB Hard Drives must be enabled under Show advanced drive properties.
-
Use the Select Button next to Boot selection to choose the downloaded CachyOS ISO.
-
Set Partition scheme to GPT to ensure the live USB is properly recognized at boot.
-
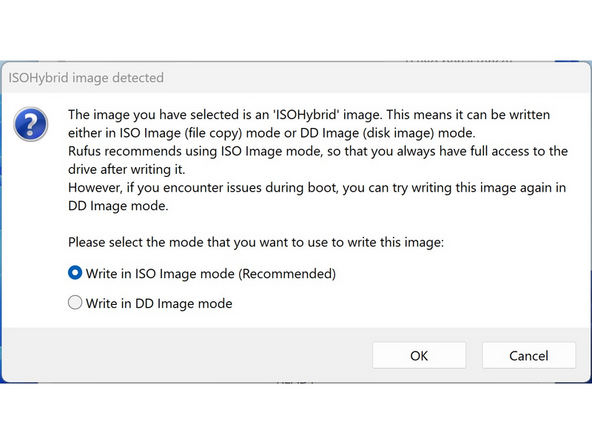
Click Start. A window will pop up to prompt for a choice between dd image mode and ISOHybrid image mode. Select ISOHybrid image mode then OK.
-
-
-
To install CachyOS, Secure Boot must be disabled! By default CachyOS will not boot with Secure Boot enabled. Please refer to our explanation of Secure Boot to learn more.
-
To disable secure boot:
-
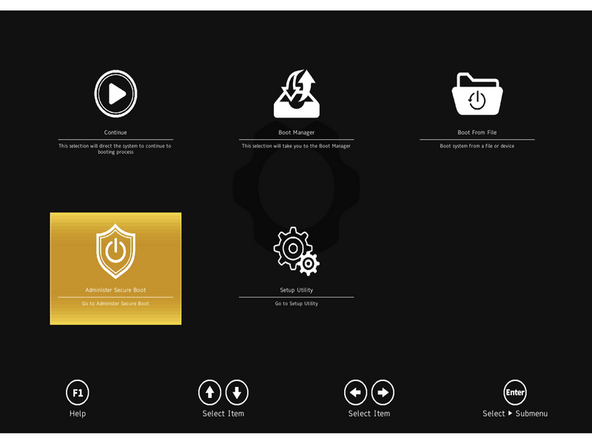
Boot into BIOS by tapping F2 just before the Framework splash screen.
-
Arrow down to Administer Secure Boot. Press enter.
-
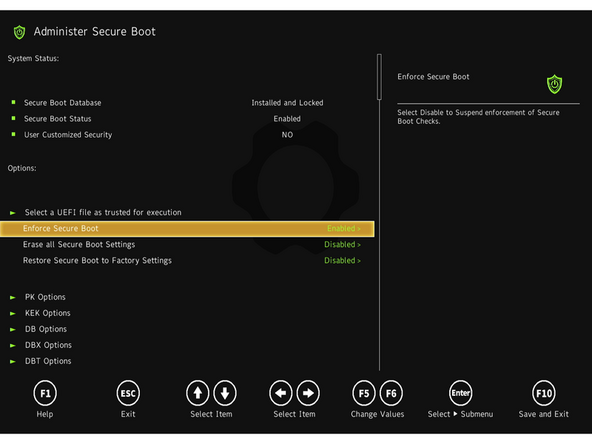
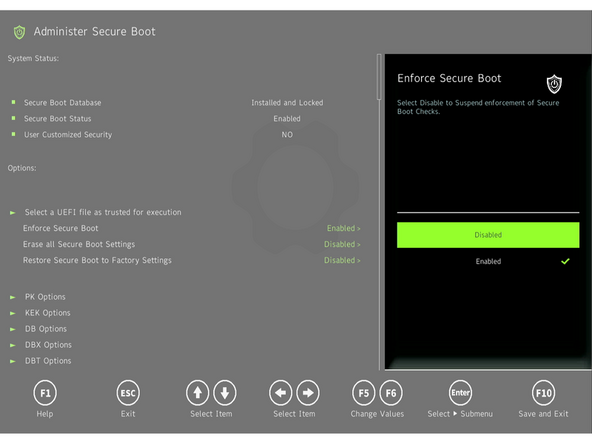
Arrow down to Enforce Secure Boot. Press enter, select Disabled, and press enter.
-
Press F10 to save and reboot. With Yes selected, press Enter.
-
To enable Secure Boot again, repeat the above steps but select Enable this time.
-
-
-
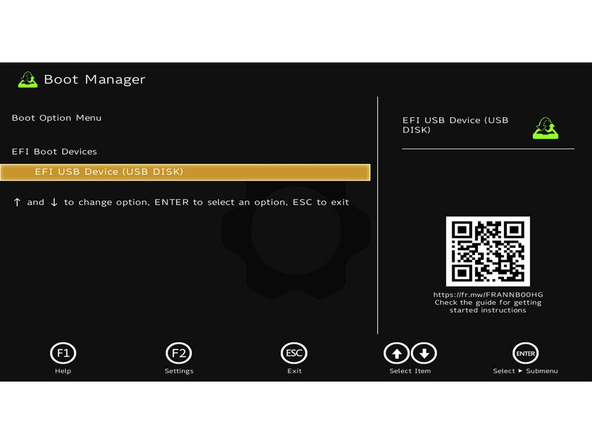
Insert the USB drive into the powered off Framework Desktop, and then power on. If an existing OS is installed on a Storage drive in the Desktop, immediately after the power light comes on begin tapping the F12 key before the Framework logo is visible.
-
If no operating system is detected, the system will automatically boot from the Live USB.
-
Select the USB drive. Press the enter key.
-
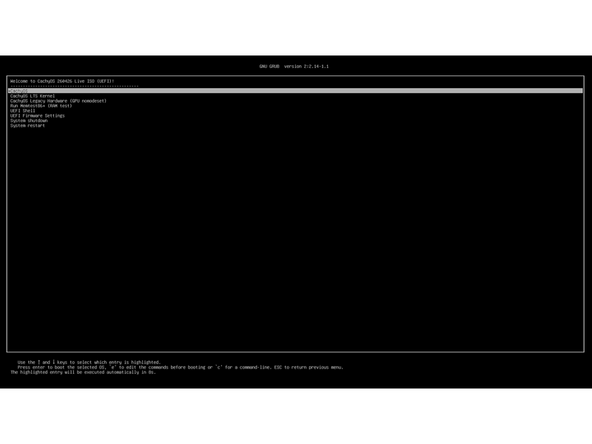
Next select CachyOS from the list (not the LTS version). Hit the enter key.
-
The speed of the flash drive will determine how quickly the live environment starts. It will boot directly to a KDE desktop in anywhere from a few to many minutes.
-
-
-
In the bottom right corner of the screen, use the WiFi icon in the system tray to connect to a network. The installer will not work without it.
-
At the time of writing, there is a bug affecting the Framework Laptop 13 Pro where the CachyOS installer will fail to remove existing partitions from internal storage. Please use KDE Partition Manager to create a new partition table on the SSD.
-
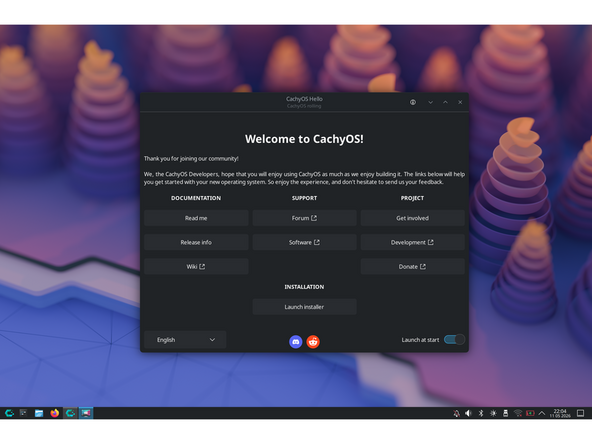
The first thing to open on the live desktop is CachyOS Hello, a greeter window that provides links to a number of useful resources, an option to select language, and a button to open the installer.
-
Click "Launch installer" in the CachyOS Hello window after connected to the internet. If the window was closed for any reason, it can be reopened using the Application Launcher on the left side of the task bar.
-
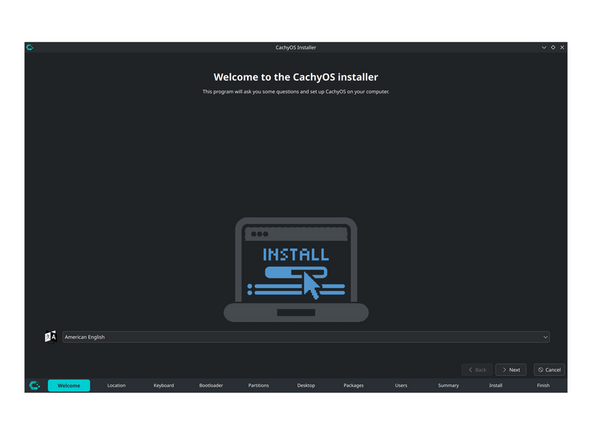
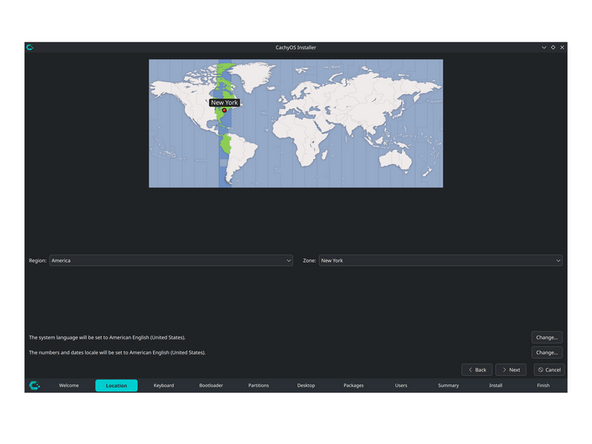
When the installer opens, select a language, region (locale), timezone, and keyboard layout, clicking "Next" to progress through each slide.
-
-
-
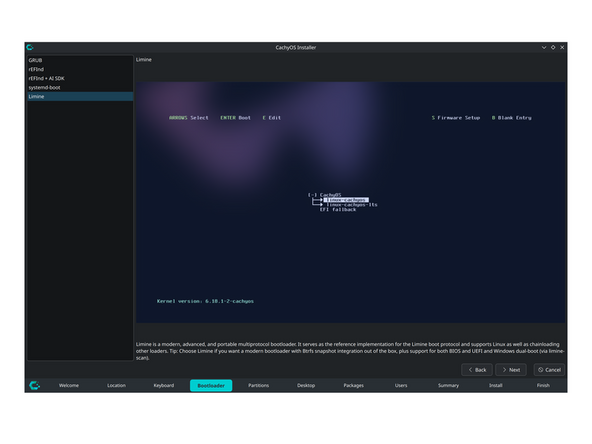
Select a bootloader. The installer includes descriptions for each option. The installer defaults to Limine. GRUB is a very mature and well documented option that's also easy to get help with.
-
The default option is the Limine, this is a newer option intended to work well with the snapshots feature of the default filesystem.
-
GRUB is a traditional option that may be preferred by long-time Linux users.
-
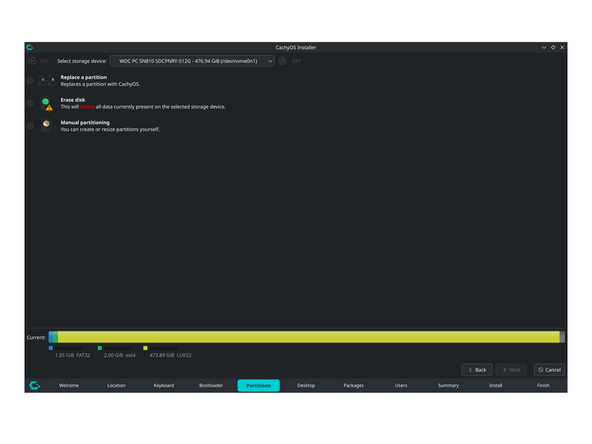
Select the drive for install and choose to Wipe the whole drive. A filesystem for the root partition can also be selected.
-
The default option is btrfs, a filesystem with features like snapshots that allow users to revert the system to a previous state if, for example, an update fails.
-
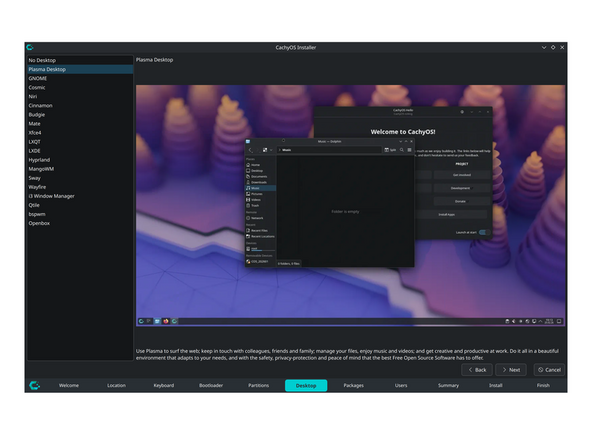
Select a desktop environment. Most of them are well described and have visual demonstrations to help selection.
-
The default option is KDE. This option will be familiar to Windows users. It can be heavily customized to the user's comfort.
-
Mac users may find Gnome or Cosmic Desktop more familiar or comfortable.
-
-
-
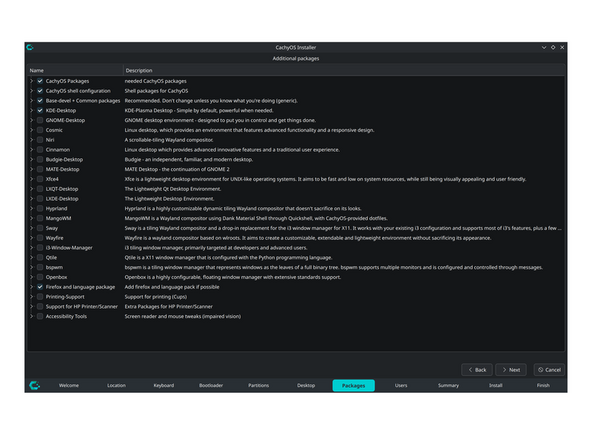
There is an option selection for extra packages. While it isn't recommended to install multiple desktop environments or display managers, it is possible to do so.
-
This is where support for Printers can be installed
-
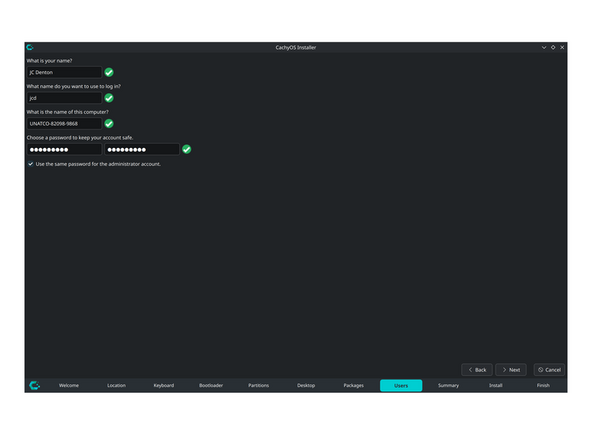
Set up the primary user by filling out the Name, Username, and Password fields with the relevant information.
-
Unchecking "Use the same password for Administrator account" allows a separate password to be set for the root account.
-
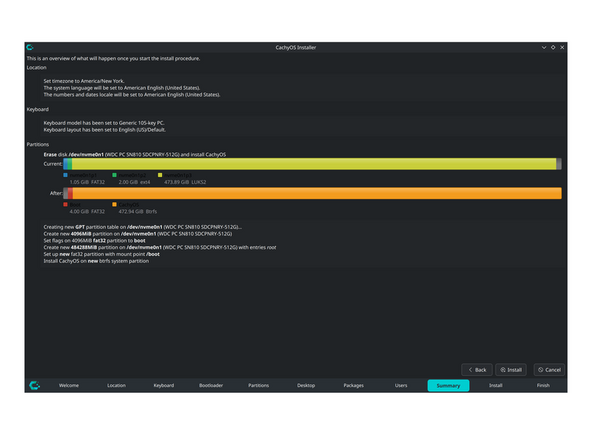
Review all the details on the Summary slide. This is the last chance to change install options and data is written to the drive.
-
After review, click Install then Install Now to finalize all selections and begin the install.
-
-
-
The package
fprintdis necessary to set up fingerprint unlock. This can be installed either by opening the Shelly graphical package manager or by opening a terminal and running the commandsudo pacman -S fprintd. -
The method to add, remove, or otherwise manage fingerprints will depend on interface.
-
In Gnome System Settings options for Fingerprint Login are found under System in the sidebar in the Users section.
-
In KDE System Settings options for Configure Fingerprint Authentication are found under Users in the sidebar.
-
While KDE allows for fingerprint unlock and fingerprint authentication for administrator permission prompts, it does not allow fingerprint on initial login for security reasons.
-
Fingerprints can also be managed in a terminal using
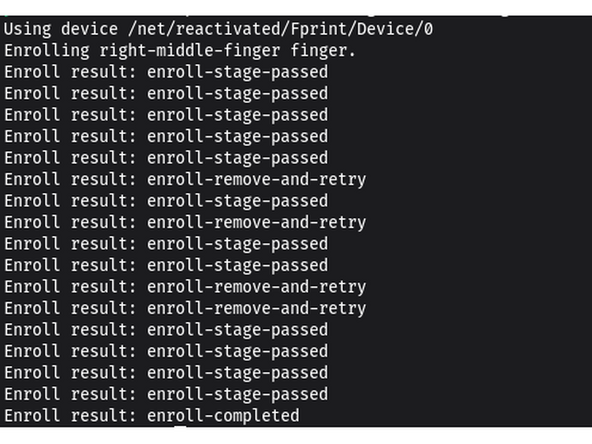
fprintd-enrollto add fingerprints,fprintd-deleteto remove fingerprints,fprintd-listto list active fingerprints, andfprintd-verifyto check that a fingerprint is enrolled and works. -
Specific fingers can be chosen by adding
-fafter thefprintd-enrollcommand. Fingers are named in all lower case with dashes used in place of spaces. For examplefprintd-enroll -f right-middle-finger. -
Further information on the
fprintcan be found on the Arch Wiki.
-
-
-
Configuration of system settings will vary depending on the desktop chosen during install. Desktop environments like Gnome, KDE, and Cosmic tend to be fully featured and include the ability to configure most things in an app called "System Settings" or similar.
-
-
-
How to check the BIOS version. Go to and click upper left corner where you see the horizontal line, search terminal and launch it. Please follow the step below:
-
sudo pacman -S lshw dmidecode --noconfirm && clear && sudo dmidecode | grep -A3 'Vendor:\|Product:' && sudo lshw -C cpu | grep -A3 'product:\|vendor:'
-
The output will tell you which Framework Laptop 13 you have and also which BIOS version you're using.
-
If you have Intel Core Ultra Series 3, you can check (Coming soon) for the latest firmware.
-
IMPORTANT: Per the instructions above, we do NOT recommend updating BIOS and firmware using various GUIs. We recommend using fwupdmgr as provided in the step above. Using GUIs can potentially create issues that would not be present using fwupdmgr directly.
-
Enjoy using CachyOS on your Framework Laptop 13 Pro!
Enjoy using CachyOS on your Framework Laptop 13 Pro!

